
Introduction
Have you ever had difficulty with female body drawing? It can be one of the most challenging aspects of art, but also one of the most rewarding. Capturing the curves and proportions accurately is crucial in creating realistic and appealing figures.
Understanding the fundamentals of anatomy and proportions is crucial. By breaking down the body into simple shapes and mastering the placement of features, you can significantly improve your drawings.
Every artist dreams of creating lifelike and expressive characters. With the right techniques and a bit of practice, you can turn your dream into a reality. Learn these tips and techniques to enhance your skills and elevate your artwork to the next level!
Ready to Nail Female Body Drawing? Let’s Start with the Basics!
Tools Required
Before you dive into female body drawing, make sure you have the right tools. Here’s what you’ll need:
- Pencils: A variety of pencils, such as 2B, 4B, and 6B, to create different shades and textures.
- Eraser: A standard eraser for general corrections.
- Sharpener: Keeping your pencils sharp is crucial for detail work.
- Kneaded Eraser: This flexible eraser helps create highlights and remove small marks without damaging your paper.
Having these tools at your disposal will make your drawing process smoother and more enjoyable.
Concept of Proportions
One of the most important aspects of female body drawing is getting the proportions right. Here are some key points to remember:
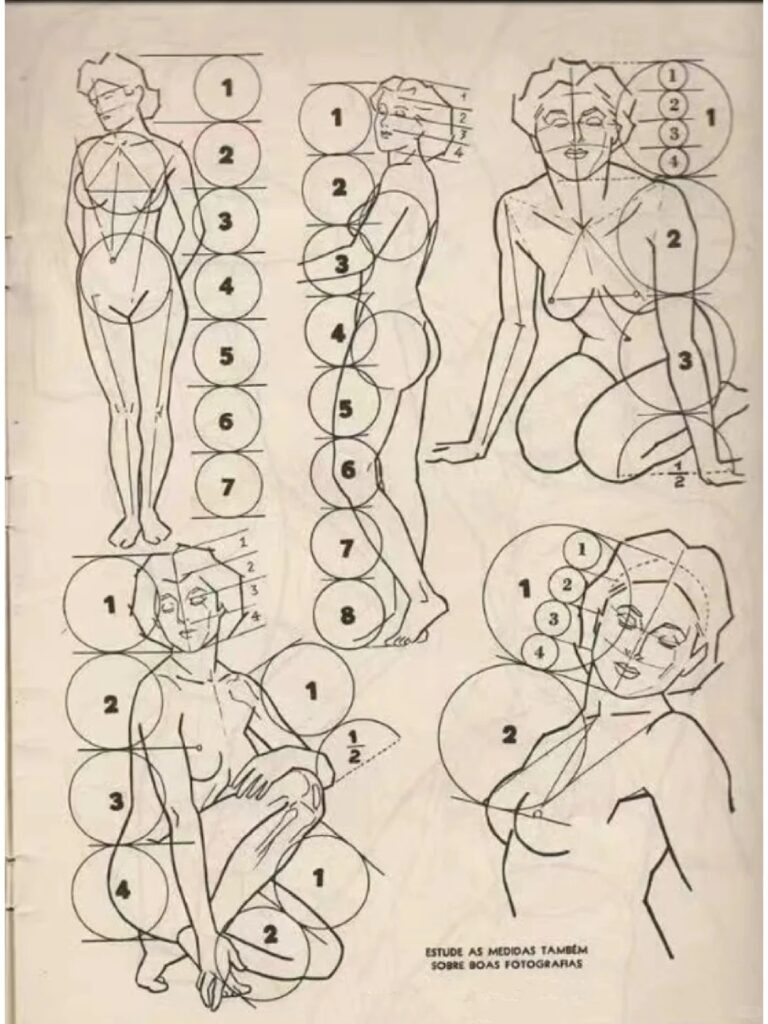
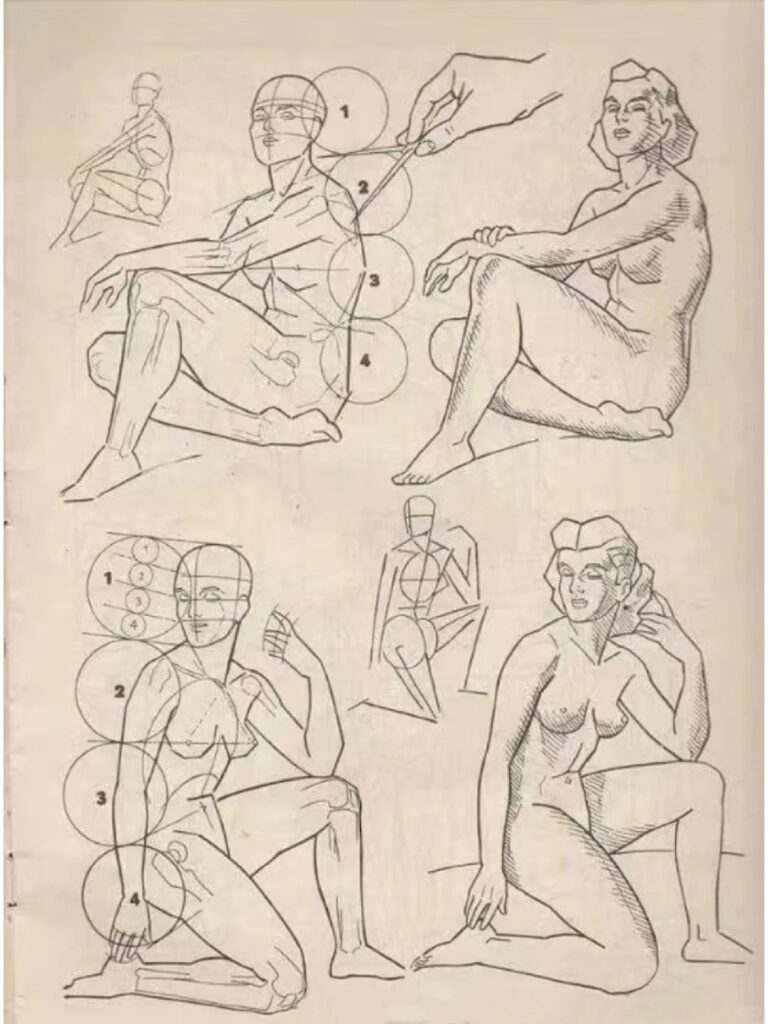
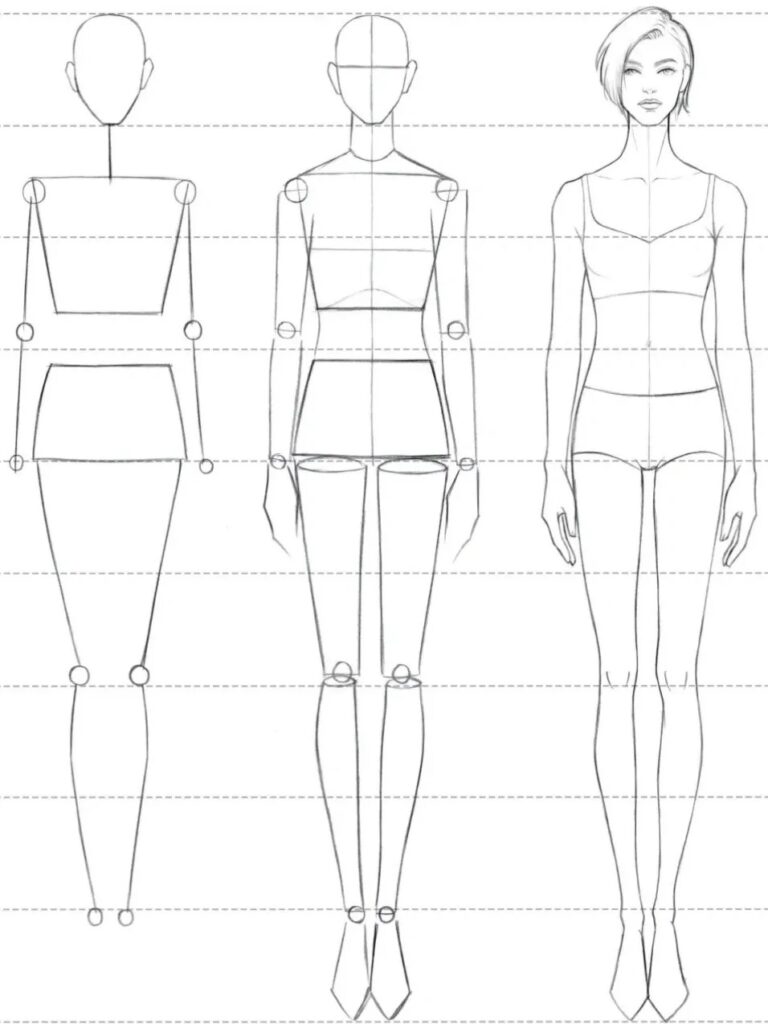
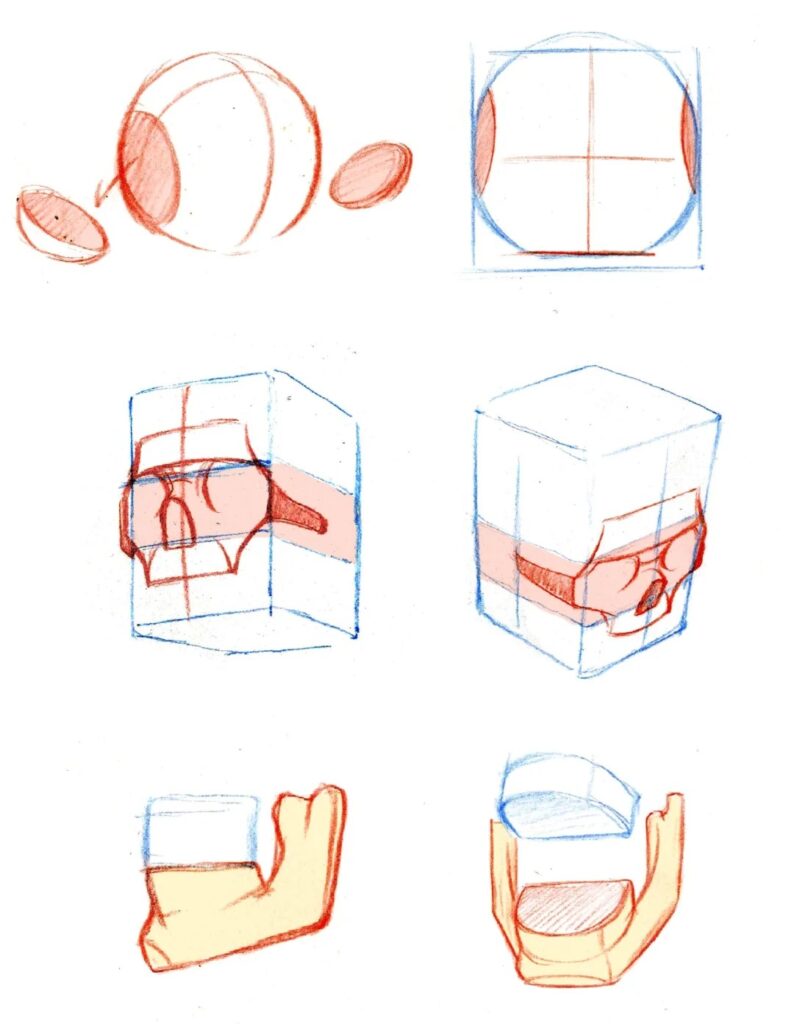
- Simplify the Body into Shapes: Break down the body into basic shapes like circles, ovals, rectangles, and triangles. This makes it easier to map out the body’s structure.
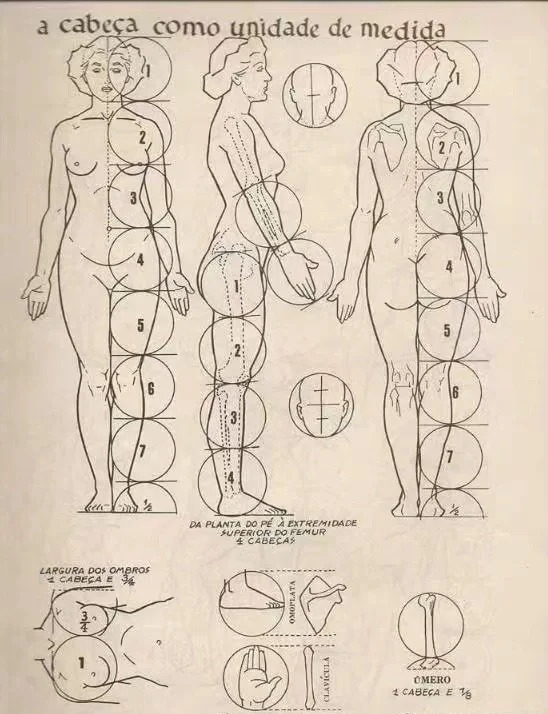
- Proportion Guidelines: A useful rule of thumb is that the average female body is about 7.5 heads tall. This means you can use the size of the head as a unit of measurement for the rest of the body.
Understanding these proportions helps create a balanced and realistic figure.

Drawing Shapes
Breaking down the female body into basic shapes can simplify the drawing process:
- Head: Start with a circle for the head and add a slight oval shape for the jawline.
- Torso: Use an oval or rectangle for the chest and ribcage area.
- Hips: Draw a wider oval or rectangle for the hips, considering the natural curve.
- Arms and Legs: Use cylinders or elongated rectangles for the arms and legs. This helps in getting the right proportions and angles.
By starting with these basic shapes, you create a strong foundation for your drawing.
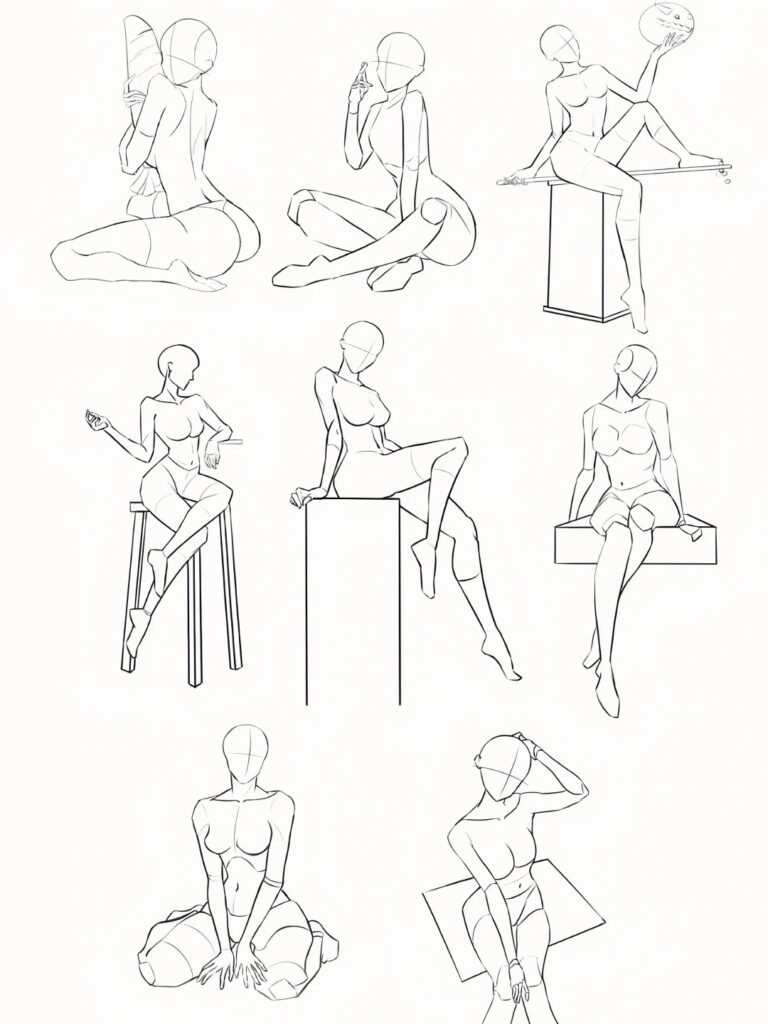
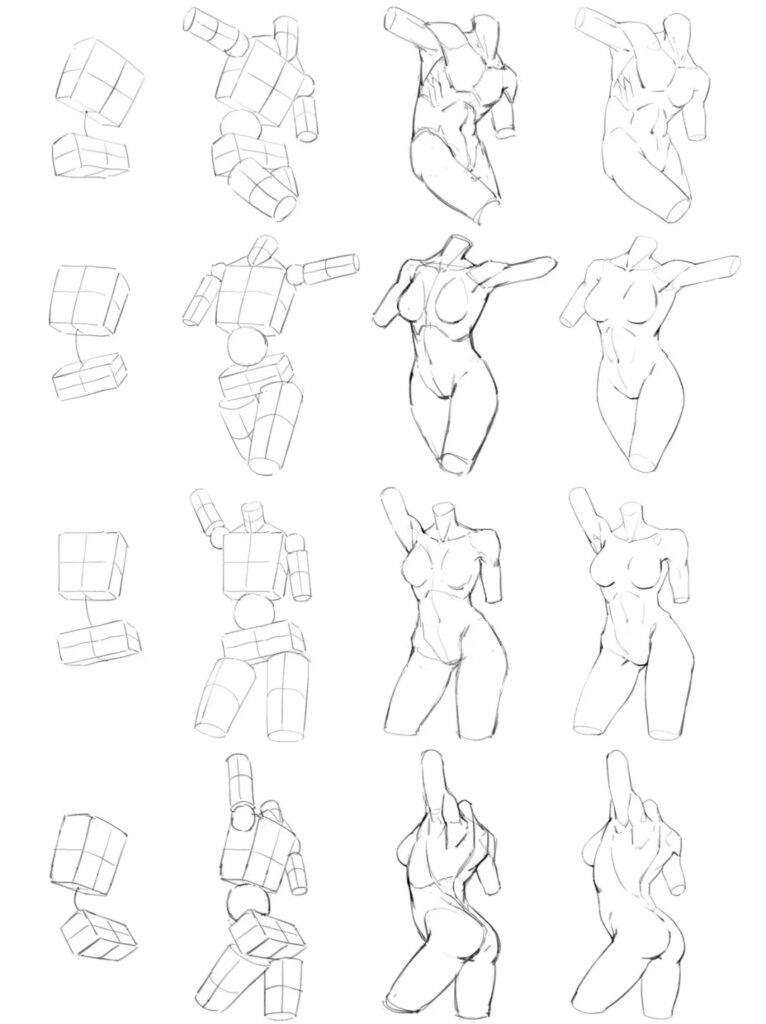
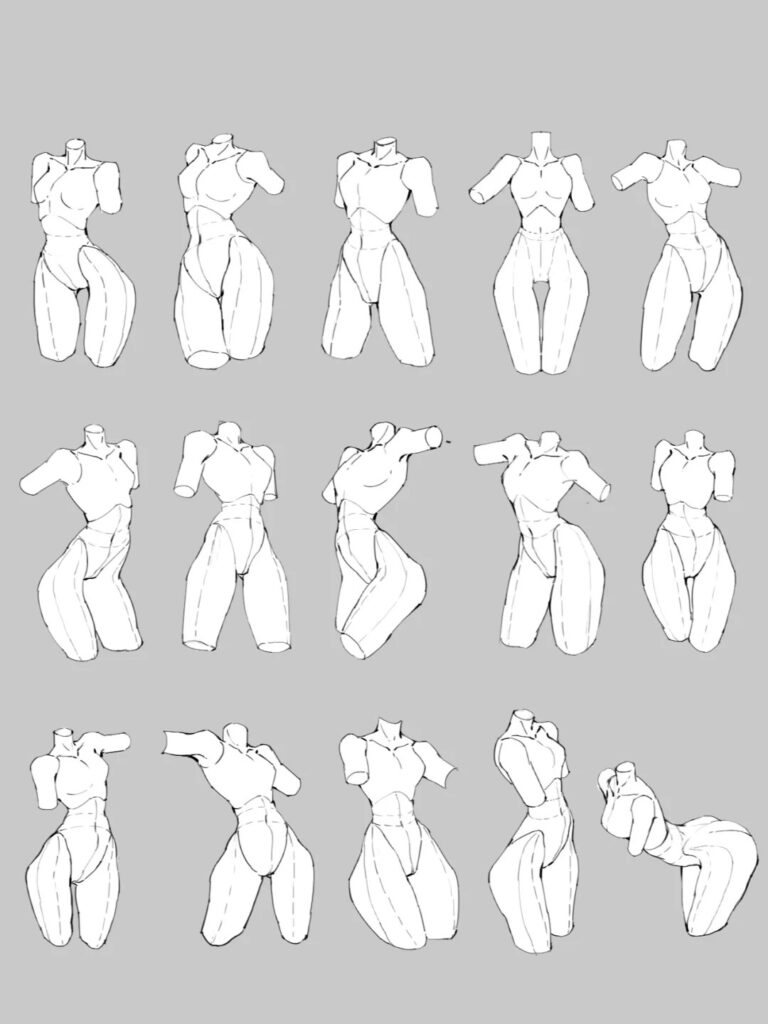
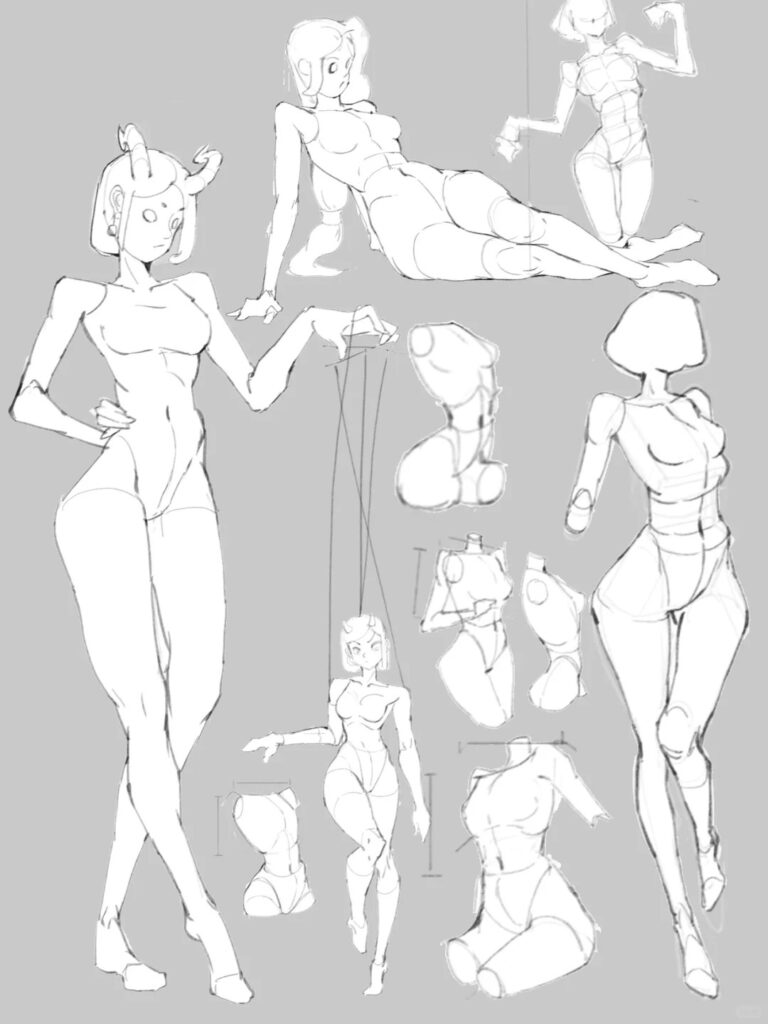
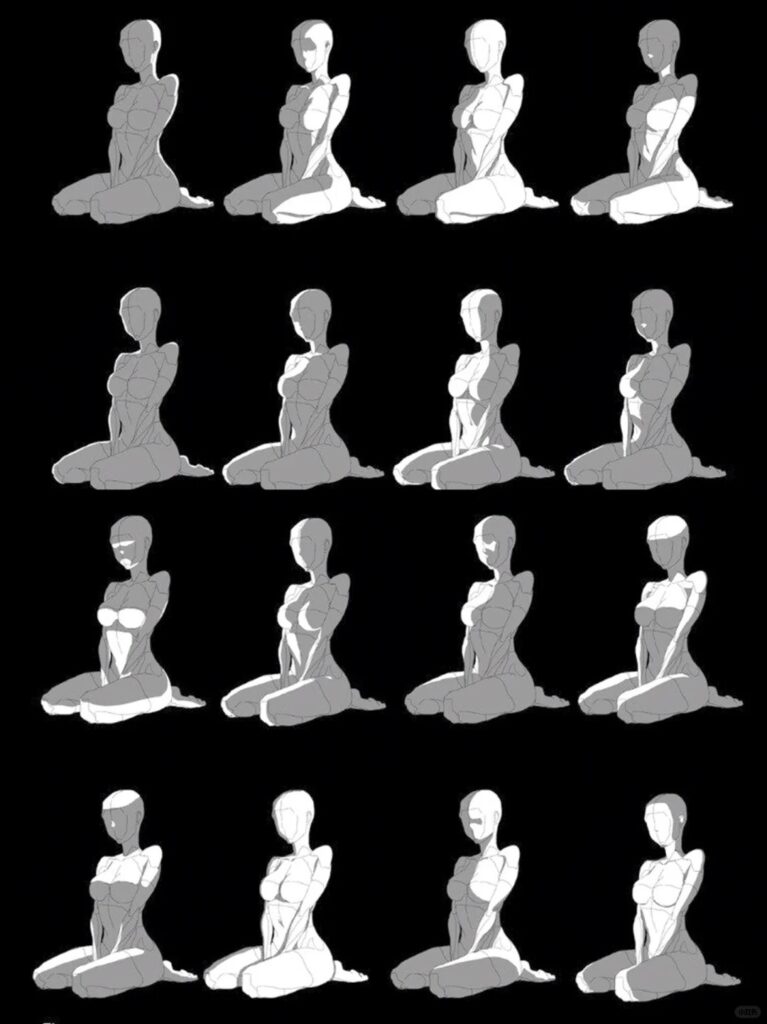
Body Kun Models
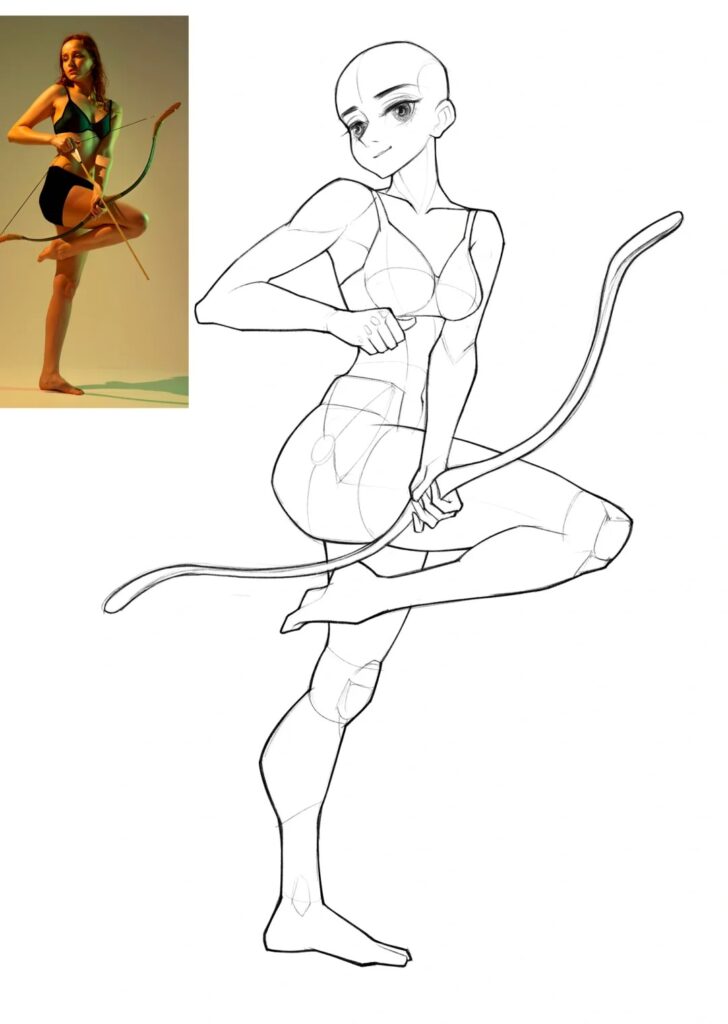
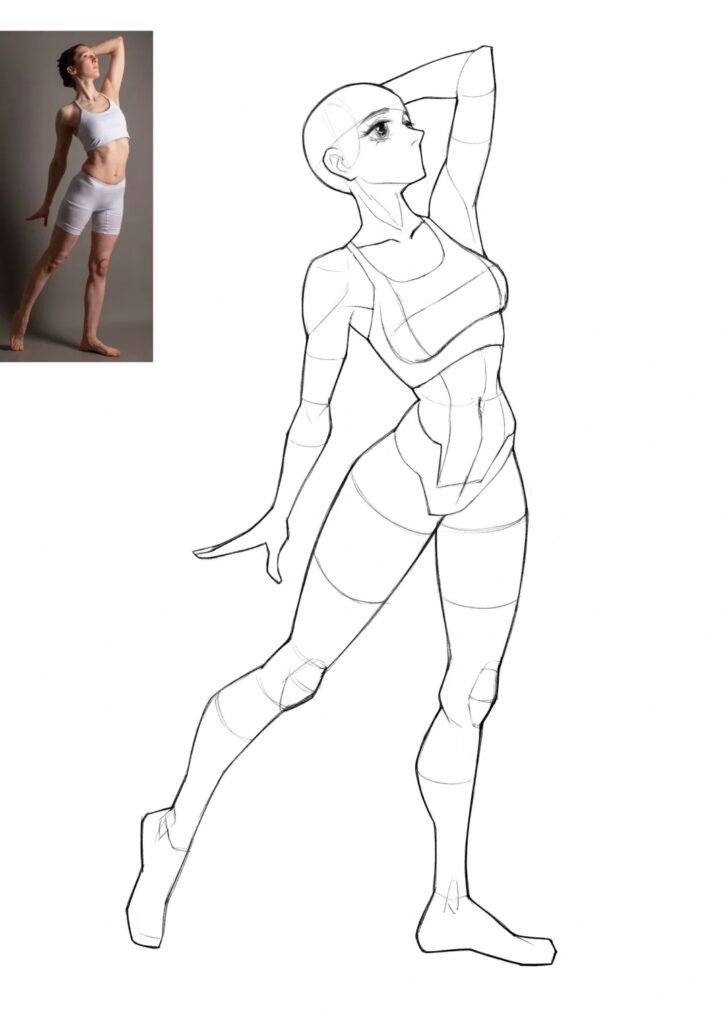
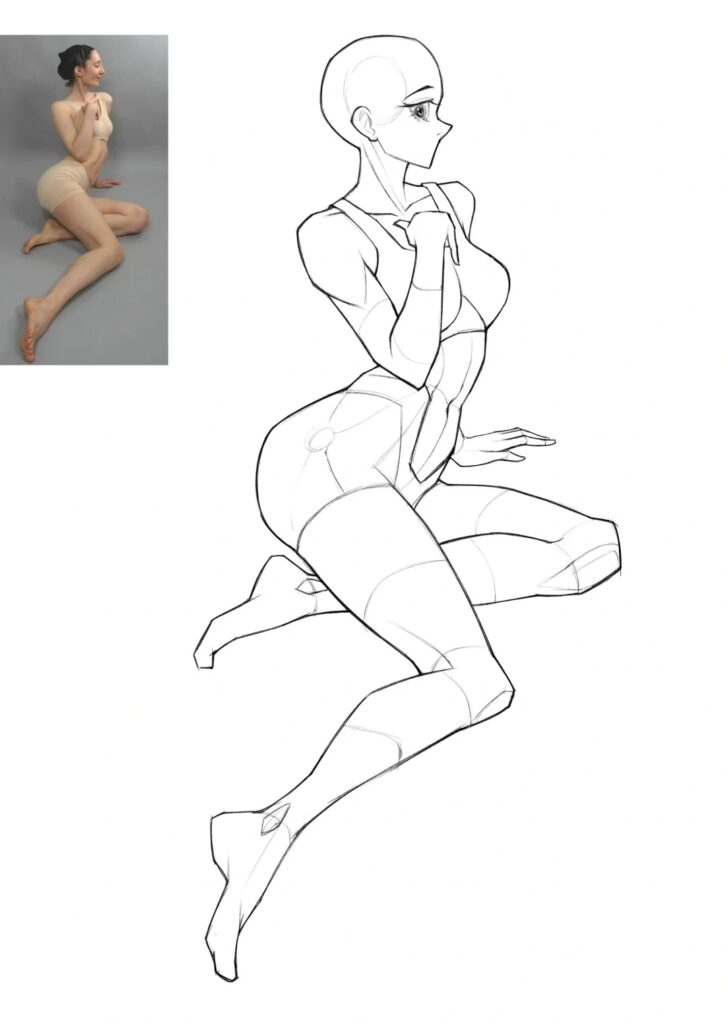
Using reference tools like Body Kun models can be incredibly helpful. These models allow you to pose and study the human figure in 3D, making it easier to understand complex poses and proportions. Keep one on your desk as a go-to reference for tricky angles and movements.
Now that you understand the basics, you’re well on your way to mastering female body drawing. With the right tools and a good grasp of proportions, you can create beautiful, lifelike figures. Up next, we’ll dive into the specifics of drawing the head, torso, arms, and legs to bring your drawings to life!
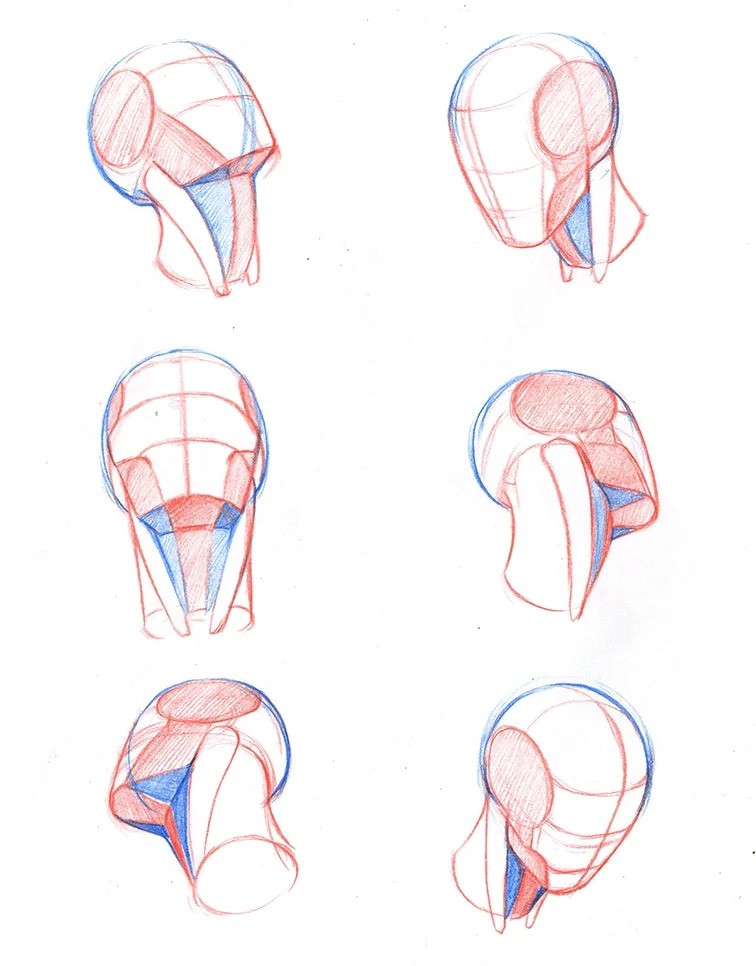
Mastering Female Body Drawing: Let’s Focus on the Head
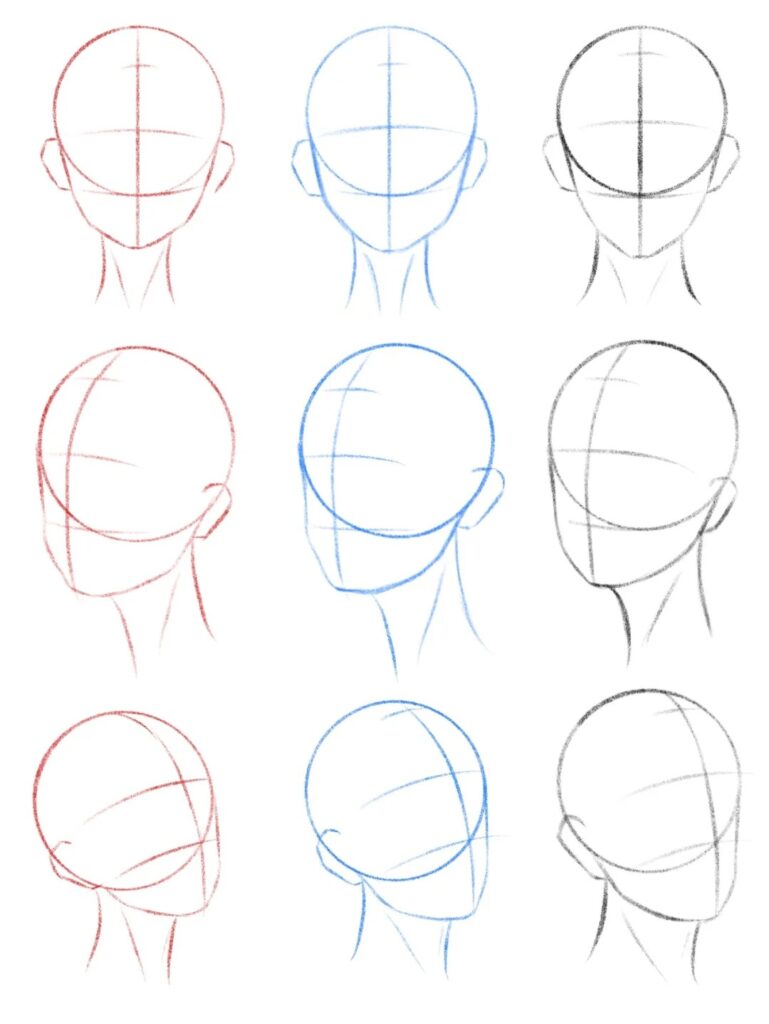
Head Shape
When you’re drawing the female body, starting with the head is crucial as it sets the tone for the entire figure. Begin with a simple circle, which represents the cranium or the top part of the head. Adding a chin to this circle helps create the foundation for the face and jawline.
- Draw a Circle: Sketch a circle to represent the top of the head. This circle should be proportionate to the overall size of the body you plan to draw. For example, if you’re following the guideline that the average female body is 7.5 heads tall, the circle should reflect this proportion.
- Add the Chin: From the bottom of the circle, draw a slightly curved line or small oval to create the chin. This line should extend downwards, forming an egg-like shape when combined with the circle. The length of this added shape determines the face’s length. Generally, it should be about one-third the length of the circle.
- Define the Jawline: Connect the sides of the circle to the chin using smooth, curved lines. This step defines the jawline. Depending on the character you’re drawing, this jawline can be more angular or softer. A rounder jawline gives a youthful appearance, while a more angular jawline can add maturity or strength to the character.
By mastering this basic head shape, you create a versatile foundation for further detailing.
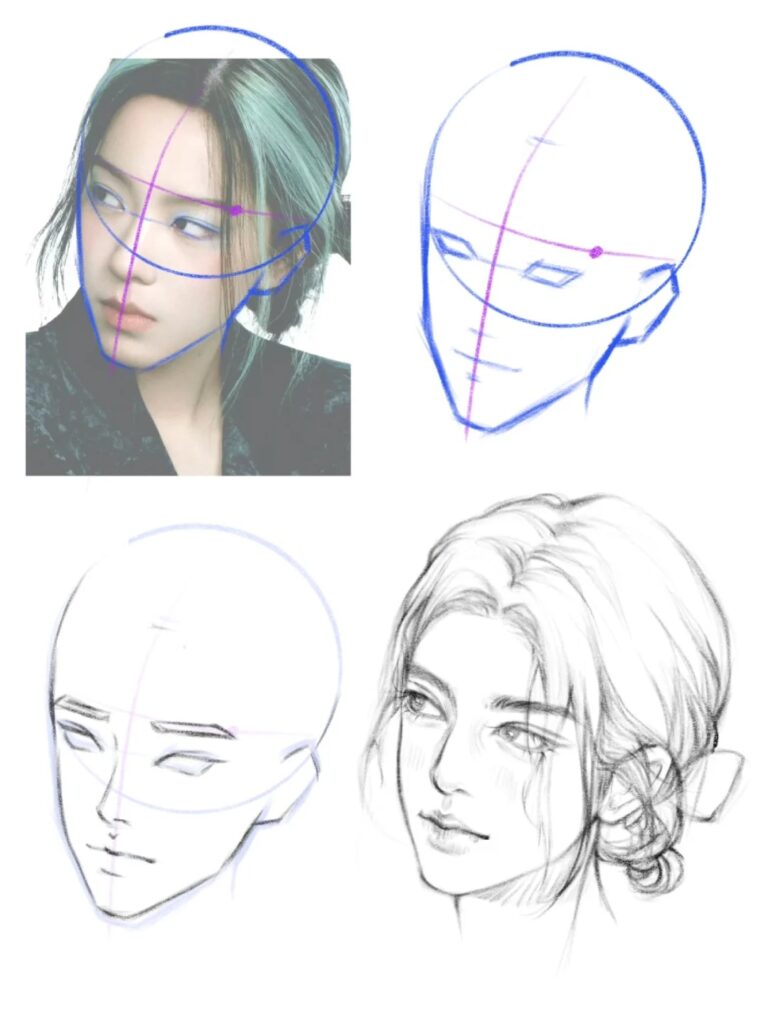
Facial Features
Facial features are essential in conveying emotion and personality. Proper placement and proportion are key to achieving a lifelike and expressive face.
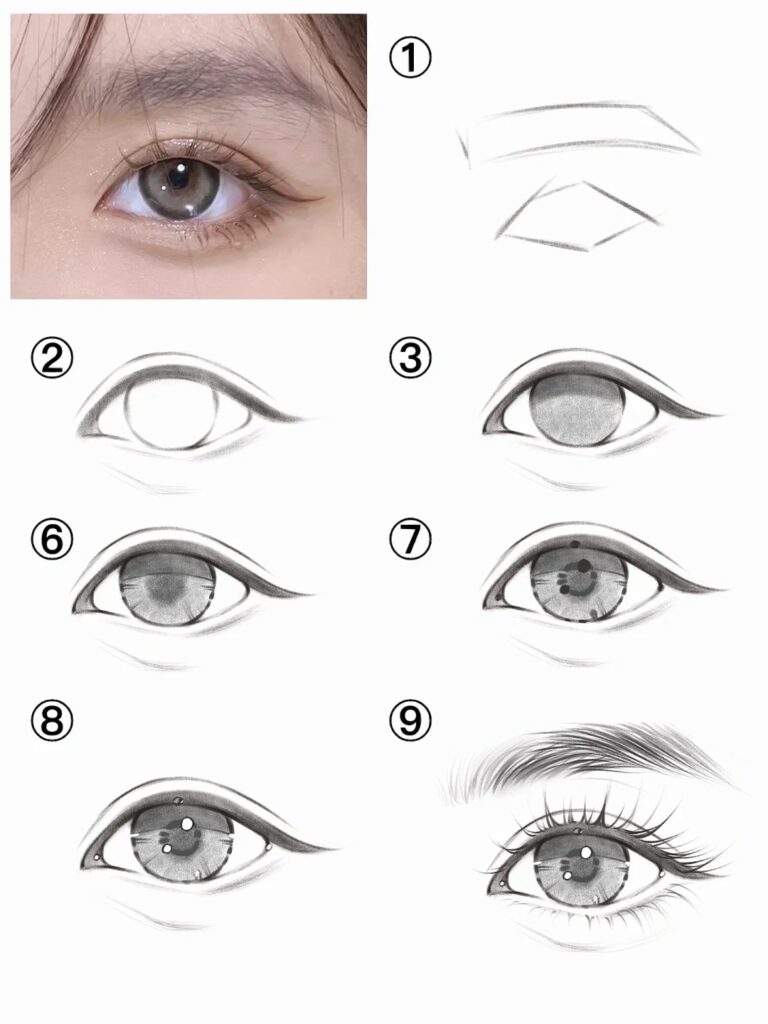
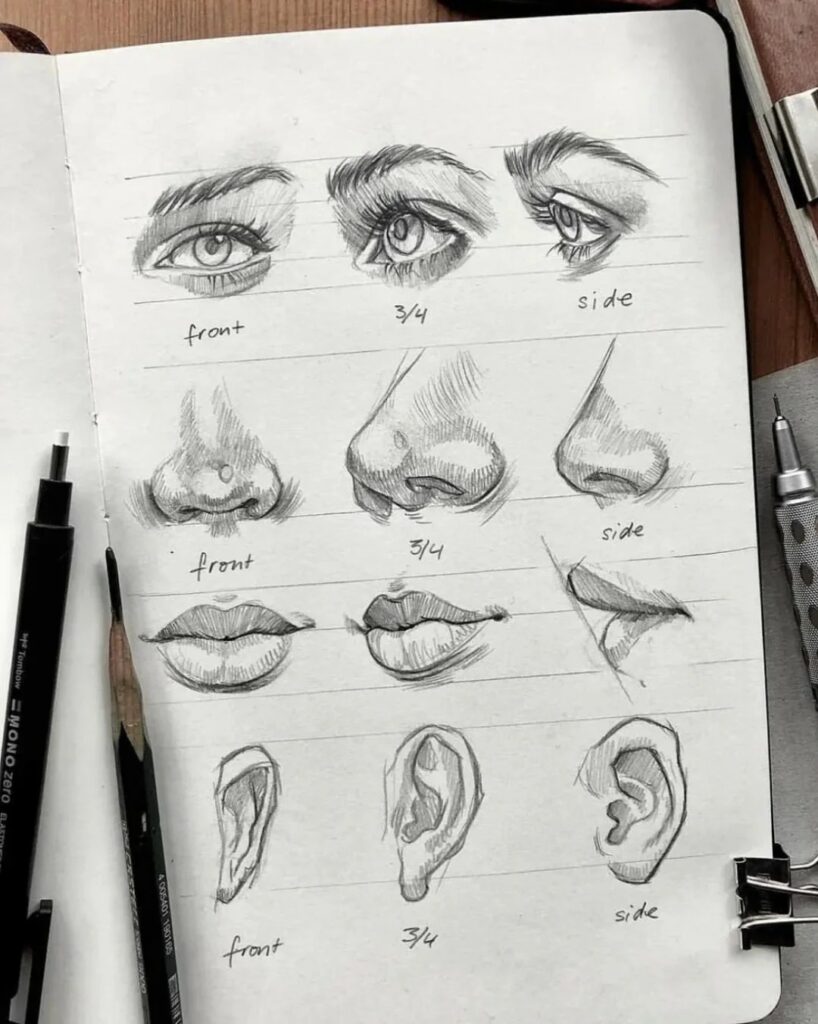
Eyes:
- Placement: Draw a horizontal line halfway down the head circle. This line is your guide for placing the eyes. Eyes should be positioned symmetrically on this line.
- Spacing: The space between the eyes should be approximately the width of one eye. This spacing helps achieve natural proportions.
- Shape: Eyes are generally almond-shaped, but this can vary based on the character’s unique traits. Draw the upper and lower eyelids, and include details like the iris and pupil for realism.
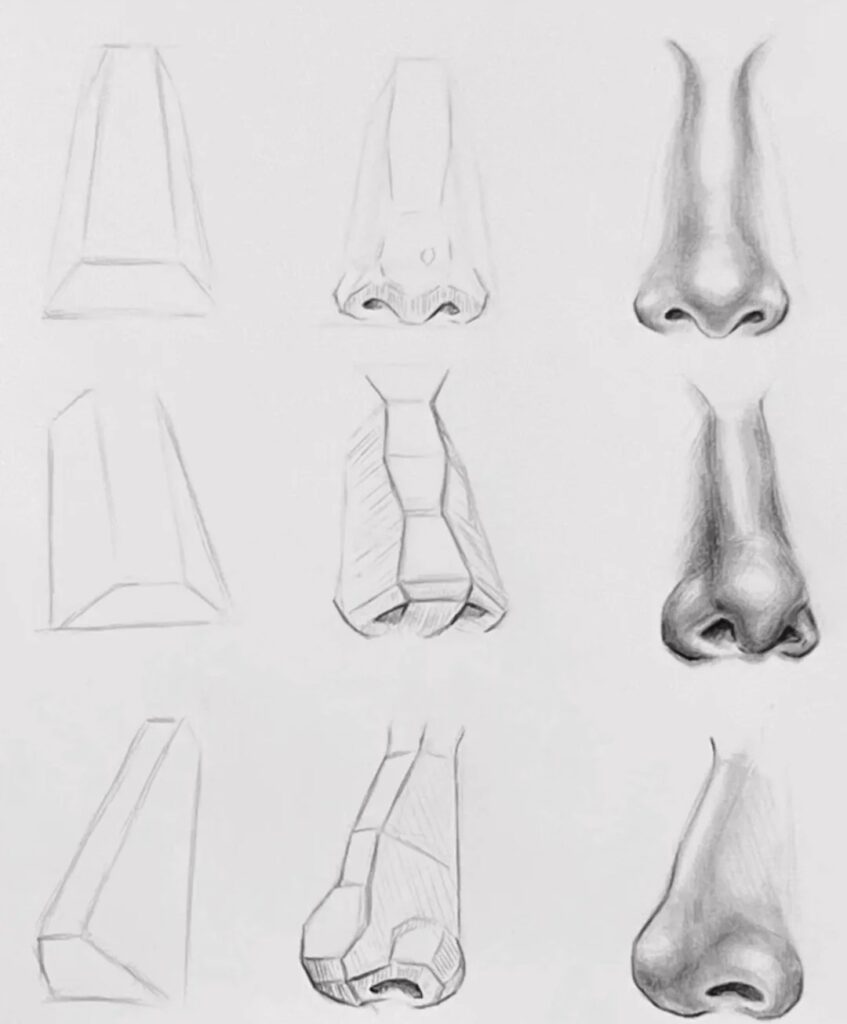
Nose:
- Placement: Draw another horizontal line halfway between the eye line and the chin. This line marks where the bottom of the nose will be.
- Shape: The nose can vary greatly in shape. Start with a basic triangle or trapezoid shape for the bridge and nostrils. Refine this shape by adding curves to create a more natural look.
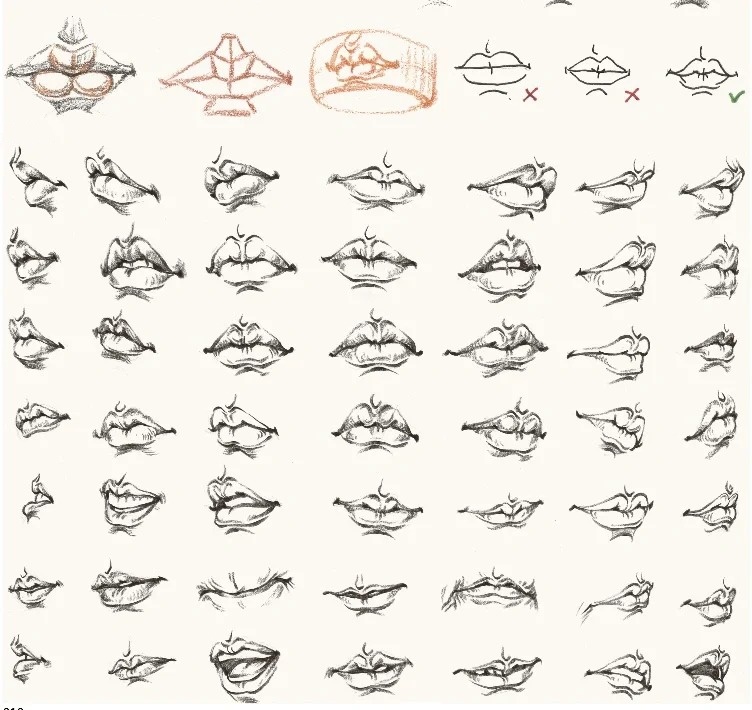
Mouth:
- Placement: Draw a line halfway between the nose line and the chin. This is where the mouth will be positioned.
- Shape: The mouth should be centered on this line. The corners of the mouth generally align with the center of each eye. Draw a slight curve to indicate the lips, and refine the shape by adding details like the cupid’s bow on the upper lip and the fuller lower lip.
Ears:
- Placement: The top of the ears should align with the eye line, and the bottom of the ears should align with the nose line.
- Shape: Ears are generally oval-shaped, but can vary based on individual traits. Add details like the helix, antihelix, and earlobe for a realistic appearance.
By following these guidelines, you ensure that the facial features are proportionate and well-placed, contributing to a harmonious and balanced appearance.
Chin
The chin is a significant part of the head that contributes to the overall shape and character of the face. Getting the chin’s shape and placement right is crucial for a realistic drawing.
- Shape: The chin can vary in shape from rounded to pointed. A rounder chin typically gives a softer and more youthful appearance, while a pointed or angular chin adds definition and can imply maturity or a strong character.Shape: The chin can vary in shape from rounded to pointed. A rounder chin typically gives a softer and more youthful appearance, while a pointed or angular chin adds definition and can imply maturity or a strong character.
- Rounded Chin: Draw a smooth, curved line connecting the sides of the jaw to form a gentle curve at the bottom.
- Pointed Chin: Draw a sharper, more angular line to create a pronounced point at the bottom of the face.
- Placement: The chin’s placement should be proportional to the rest of the face. Ensure that the chin fits well within the overall length of the head and does not appear too large or too small. The chin should be approximately one-third of the total length of the face from the bottom of the nose to the bottom of the chin.
- Refining the Chin: Add subtle shading and highlights to the chin to give it depth and dimension. This step helps create a more realistic appearance. Observe how light falls on the chin and add shadows where necessary.
With these detailed steps, drawing the head becomes a manageable task that sets a strong foundation for the rest of your female body drawing. Next, we’ll explore how to draw the torso, which will help you build a balanced and proportionate figure.
Mastering Female Body Drawing: Let’s Tackle the Torso
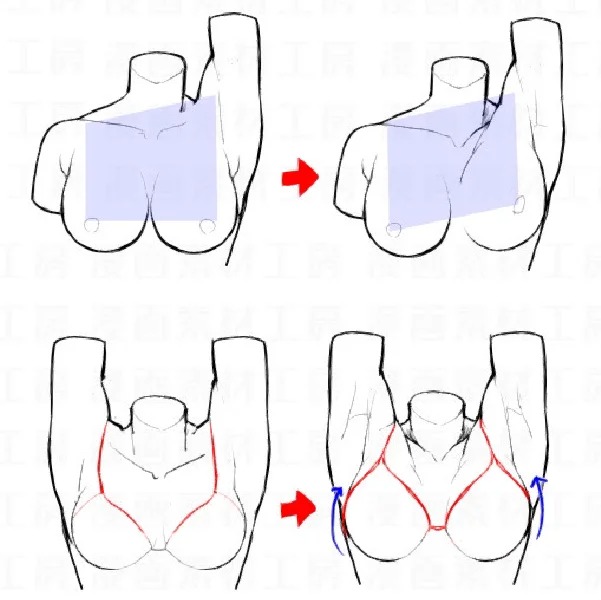
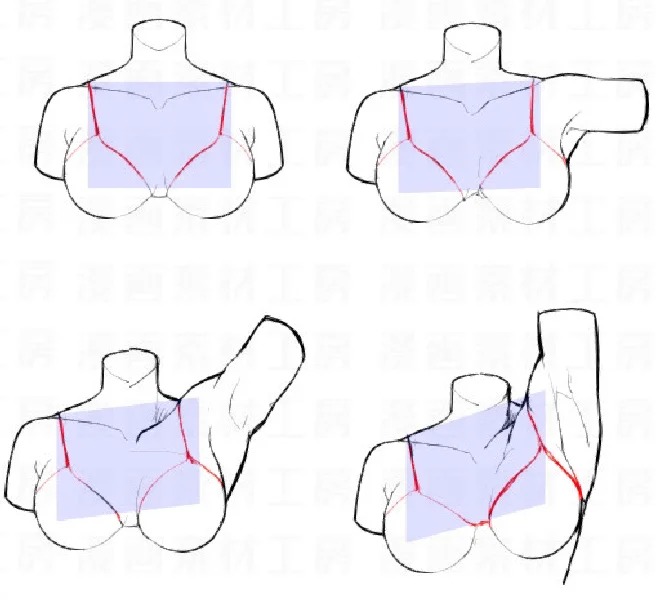
Chest and Breasts
Drawing the chest and breasts can be challenging, but understanding the underlying structure helps immensely.
Structure of the Ribcage and Sternum:
- Ribcage: Start with an oval shape that represents the ribcage. This should be wider at the top and narrower at the bottom. The ribcage provides the framework for the chest.
- Sternum: The sternum is the vertical bone in the center of the chest. Draw a line down the middle of the ribcage to indicate the sternum. This helps keep the chest symmetrical.
Observing and Drawing the Size, Shape, and Position of Breasts:
- Position: Breasts are positioned on either side of the sternum, sitting on top of the ribcage. They typically start just below the collarbone and extend down to the sixth or seventh rib.
- Shape: Breasts vary greatly in shape and size. For a natural look, use curved lines to draw their outlines. Think of them as teardrop-shaped, with the fuller part at the bottom.
- Size: The size should be proportional to the rest of the body. Avoid drawing them as perfect circles; instead, use gentle curves to reflect their natural shape.
- Gravity: Remember that breasts are affected by gravity, so they should have a natural droop rather than being perfectly round or perky.
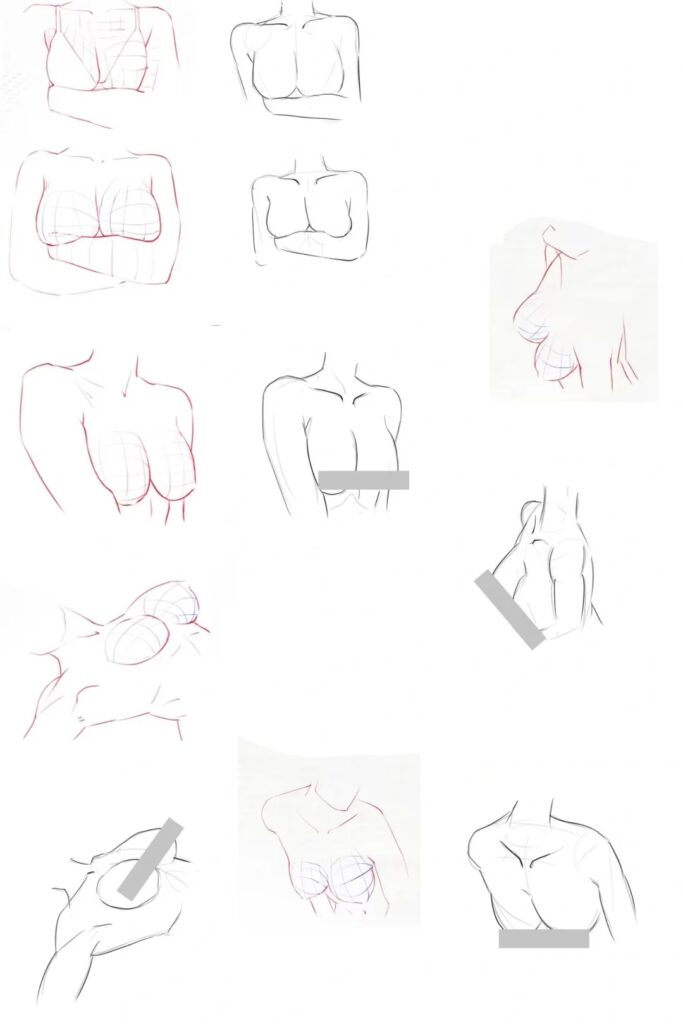
Paying attention to these details ensures that the chest and breasts look realistic and appropriately placed on the torso.
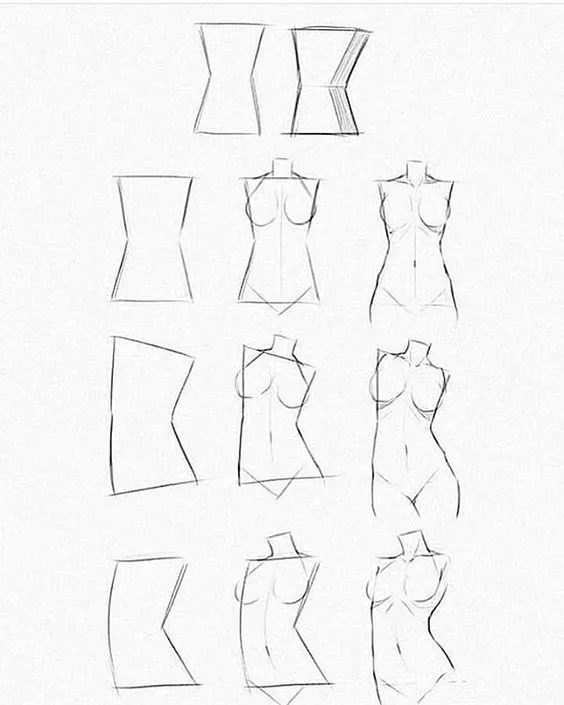
Waist and Hips
Next, let’s move on to the waist and hips, which are crucial for achieving a balanced and proportionate figure.
Narrowest Part of the Torso:
- Waist: The waist is the narrowest part of the torso. Draw a horizontal line just below the ribcage to mark the waist. The distance between the bottom of the ribcage and the waist should be about one head length.
- Curves: Use curved lines to create the natural inward curve of the waist. This curve varies depending on the body type. A more pronounced curve indicates a curvier figure, while a less pronounced curve suggests a straighter figure.
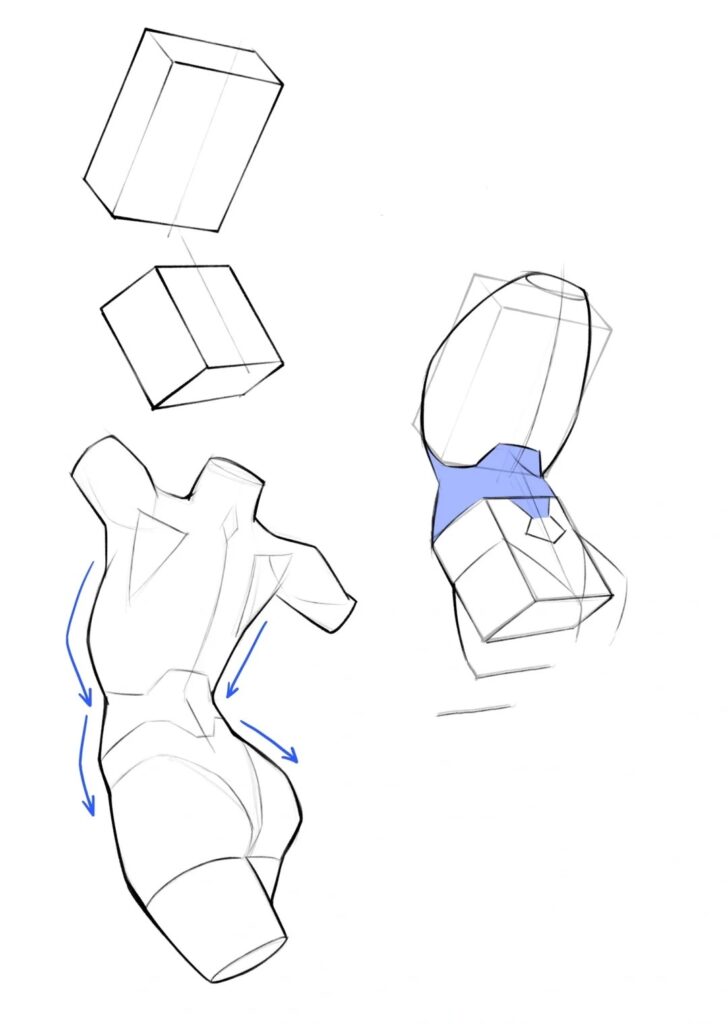
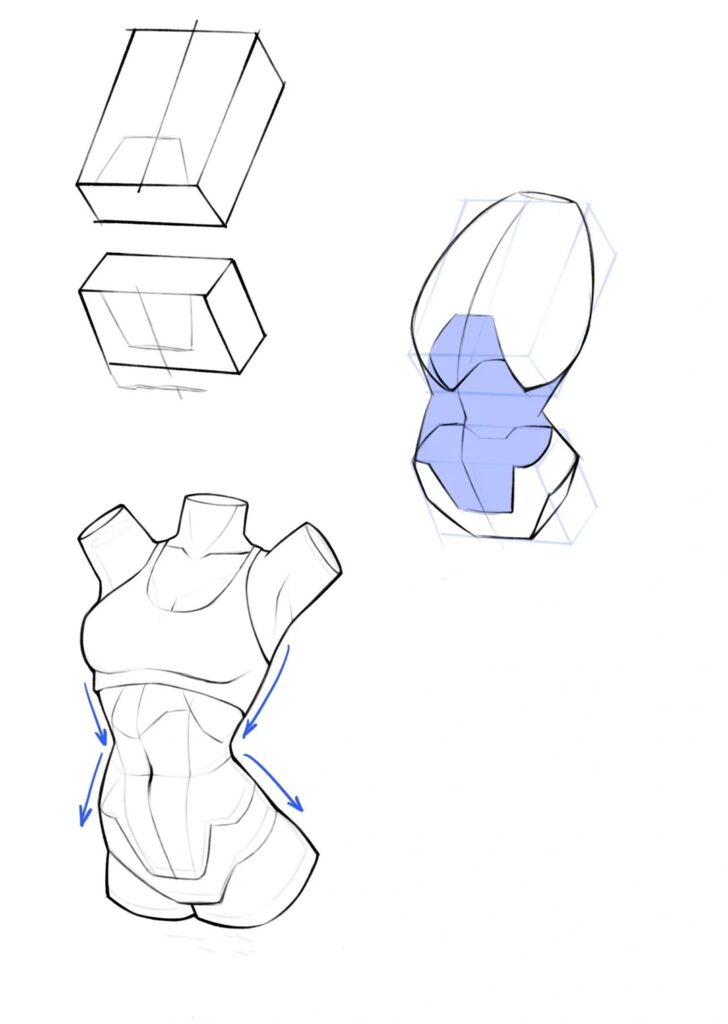
Placement of the Hip Bone:
- Hips: The hips are wider than the waist and form the base of the torso. Draw a horizontal line at the level of the hip bones, which is usually about one head length below the waist.
- Shape: Use curved lines to connect the waist to the hips, creating the hourglass shape typical of the female form. The hips should be roughly as wide as the shoulders for balanced proportions.
- Hip Bones: Indicate the hip bones with slight protrusions on either side of the hips. These bones provide structure and should be slightly visible, depending on the body type.

By carefully drawing the waist and hips, you achieve a realistic and proportionate torso that forms a solid foundation for the rest of the body.
Mastering the torso in female body drawing is all about understanding the structure and natural curves of the body. By focusing on the ribcage, sternum, breasts, waist, and hips, you can create a balanced and lifelike figure. Next, we’ll move on to drawing the limbs, which will complete the basic structure of your female body drawing.
Nailing Female Body Drawing: Let’s Focus on the Arms
When it comes to drawing the female body, the arms can be tricky due to their movement and positioning. Let’s break it down step by step.
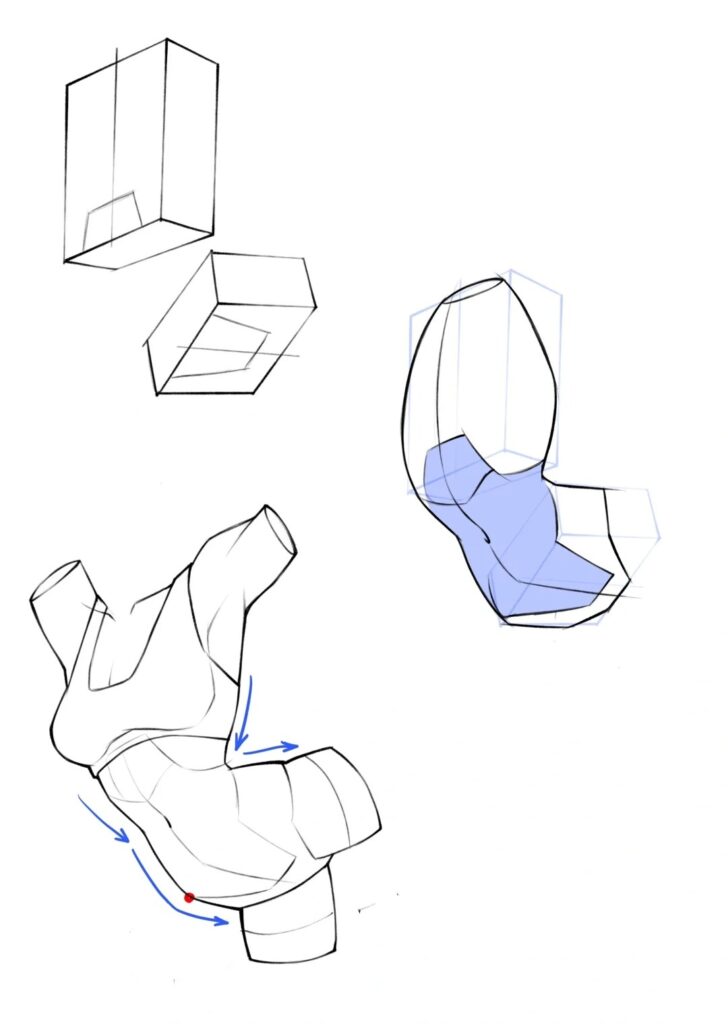
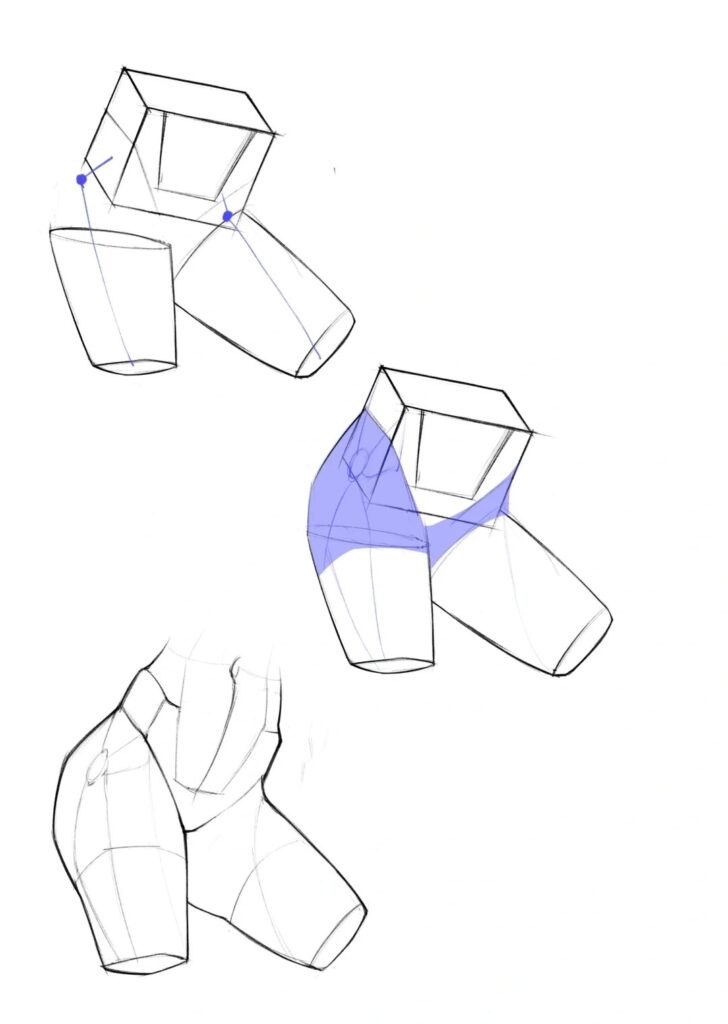
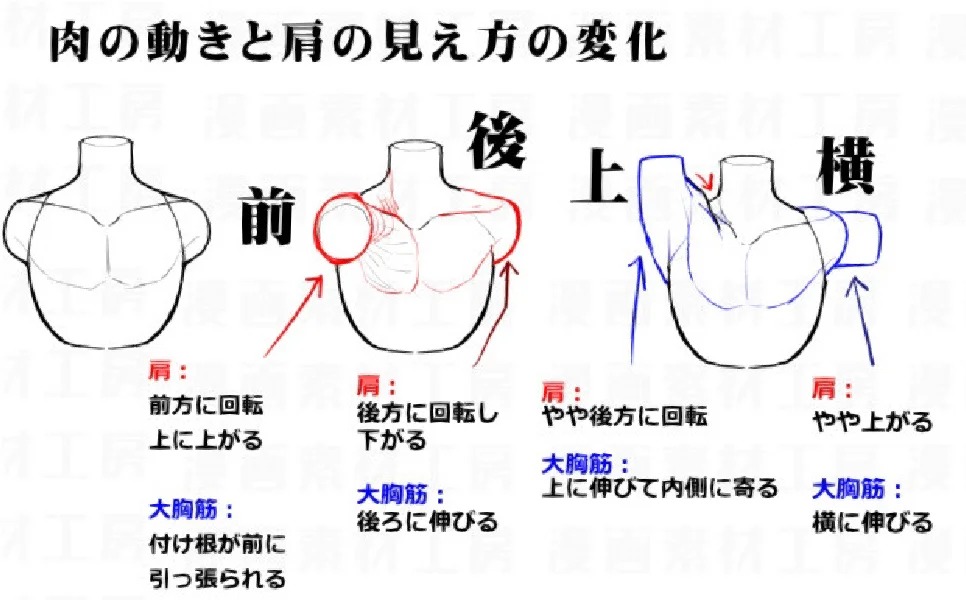
Shoulders and Elbows
Establishing the Shoulder Line and Upper Arm Shape:
- Shoulder Line: Begin by drawing the shoulder line. This is a horizontal line extending from one side of the ribcage to the other. The shoulders should be slightly wider than the hips for balanced proportions.
- Shoulder Muscles: Sketch small circles at each end of the shoulder line to represent the shoulder joints. The deltoid muscles, which cover these joints, should be drawn as rounded shapes that taper towards the arm.
- Upper Arms: Draw the upper arms from the shoulder joints. The upper arms should taper slightly as they approach the elbows. Think of the upper arm as a cylinder, wider at the top and narrower at the bottom. This part of the arm can be divided into thirds: the first third is the shoulder, the second third is the bicep area, and the last third leads into the elbow.
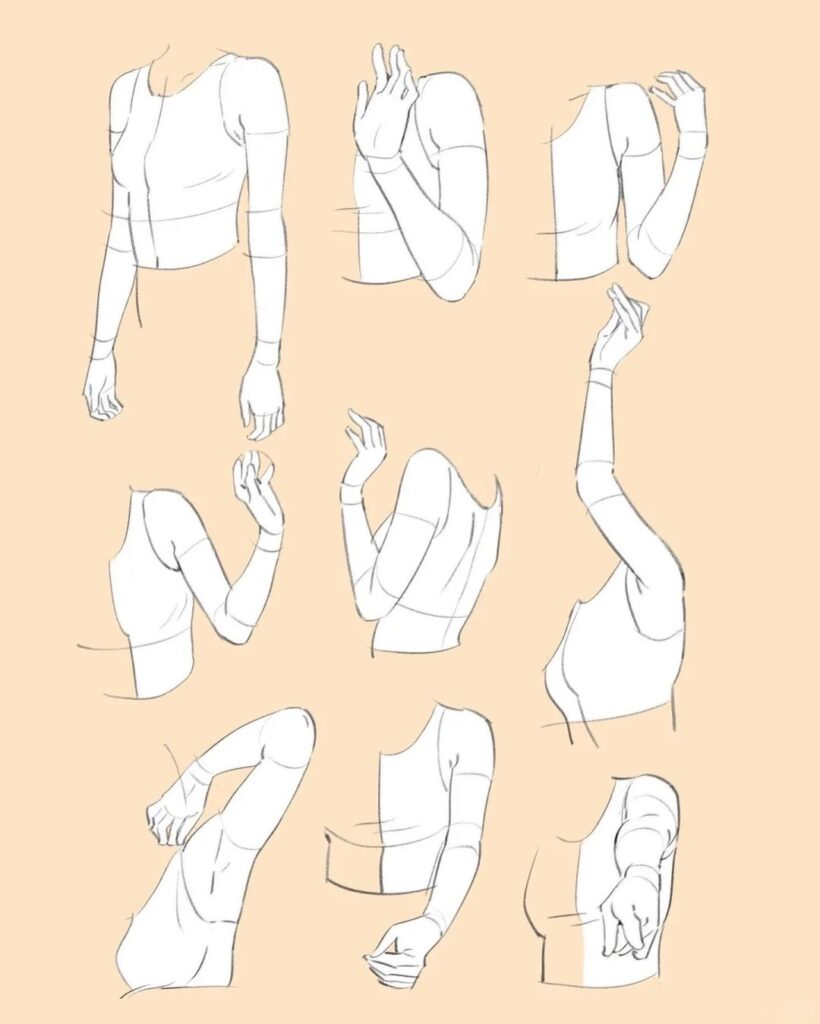
Elbows:
- Placement: The elbows should be positioned just above the waist when the arms are hanging naturally by the sides. Draw small ovals to represent the elbow joints.
- Flexibility: Remember, the elbow is a hinge joint, so it only bends in one direction. Indicate this with a slight bend in the oval shape of the elbow, showing the natural curvature of the joint.
- Connecting Upper and Lower Arms: Connect the upper arms to the elbows with smooth, slightly curved lines. Ensure the connection looks natural, avoiding sharp angles.
Hands and Fingers
Basic Shapes and Details of the Hands:
- Hand Shape: Start with the basic shape of the hand. Draw a rectangle or a trapezoid extending from the wrist to the fingertips. The hand should be about the same length as the face.
- Wrist: Draw the wrist as a narrow connection between the forearm and the hand. The wrist should be thinner than the forearm and can be indicated by two curved lines that converge towards the hand.
- Palm: Divide a rectangle or trapezoid into the palm and fingers. The palm occupies roughly half the length of the hand.
Fingers:
- Finger Placement: Draw four lines extending from the top of the palm to represent the fingers. The middle finger should be the longest, with the index and ring fingers slightly shorter and the pinky the shortest.
- Finger Joints: Each finger has three joints (excluding the thumb, which has two). Indicate these joints with small circles and connect them with straight or slightly curved lines to show the natural bending points.
- Thumb: The thumb extends from the side of the palm at an angle. Draw it with a slightly thicker base and two joints. The thumb should reach about halfway down the index finger.
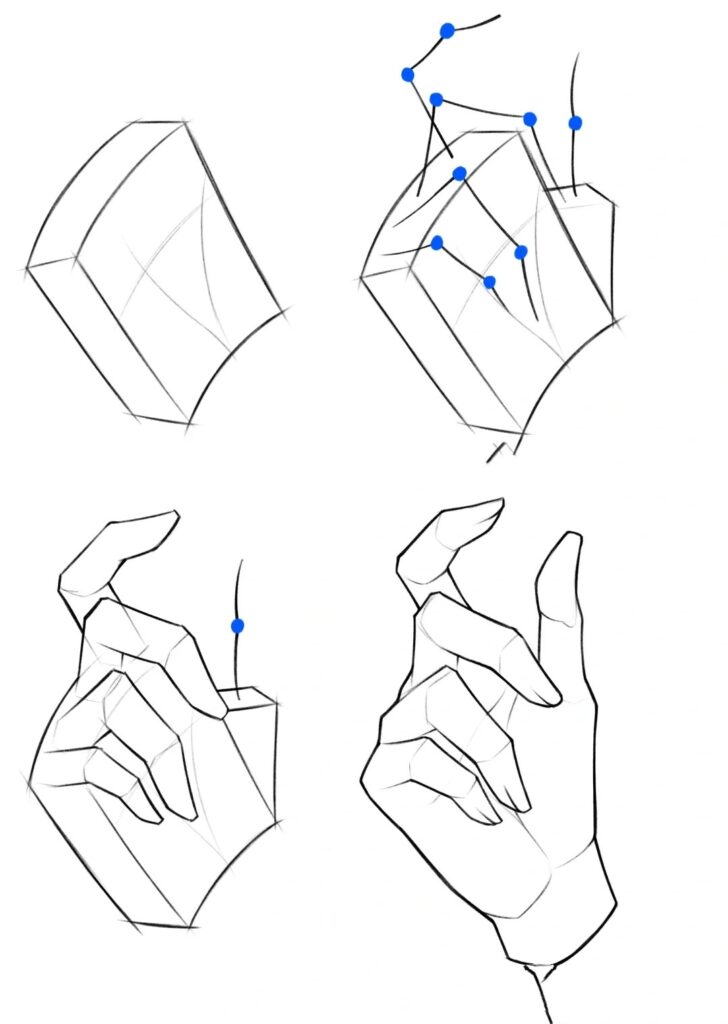
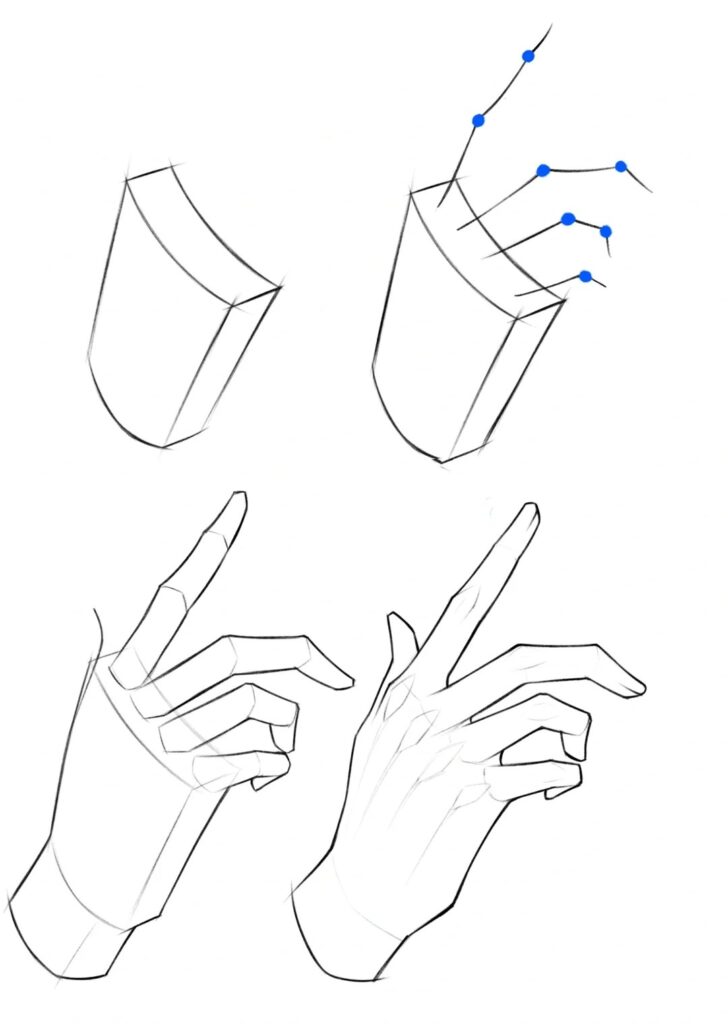
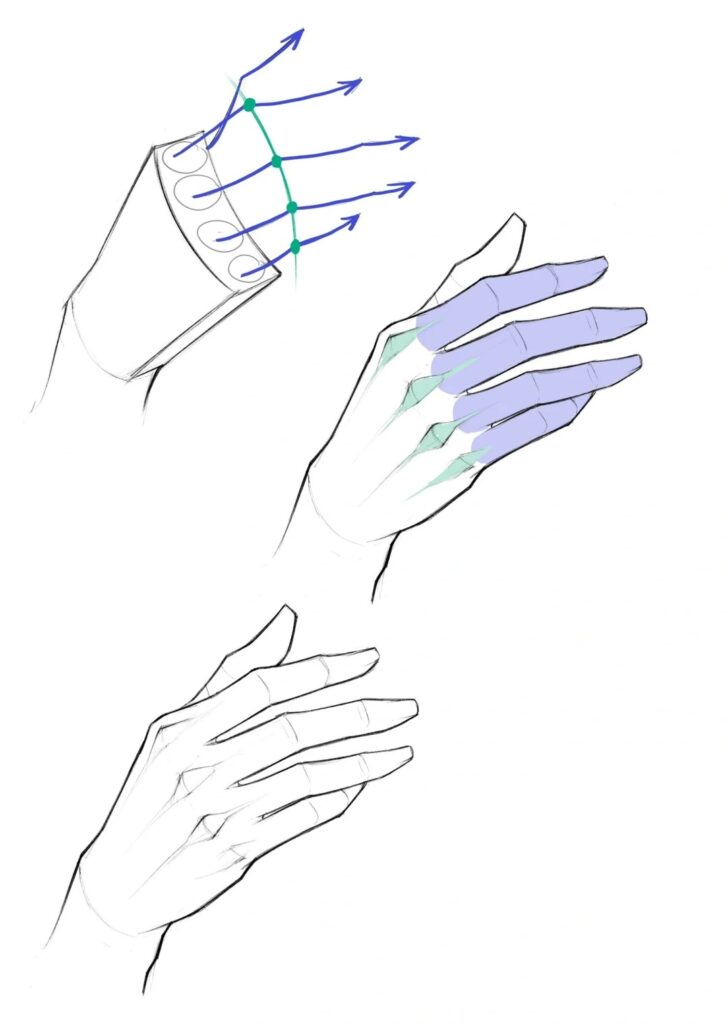
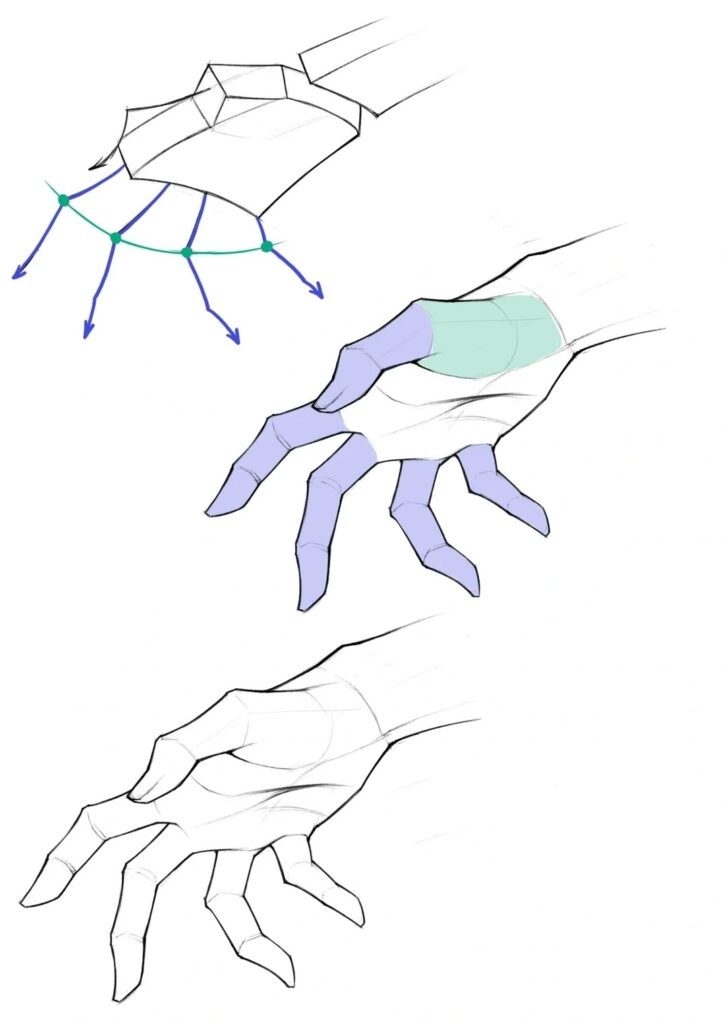
Details:
- Knuckles and Nails: Add knuckles by drawing small ovals at each finger joint. Sketch the nails as small, curved lines at the tips of each finger.
- Flexibility and Curvature: Ensure the fingers have a natural curve. They shouldn’t be perfectly straight; slight bends make them look more realistic.
By paying attention to these details, your female body drawing will capture the natural look and flexibility of the arms. Each part, from the shoulders to the fingers, should look proportionate and realistic. Next, we’ll tackle drawing the legs to complete the body structure.
Mastering Female Body Drawing: Let’s Dive into the Legs
Drawing the legs is crucial in creating a well-proportioned and dynamic female body drawing. Let’s break down the process, focusing on the thighs, knees, lower legs, and feet.
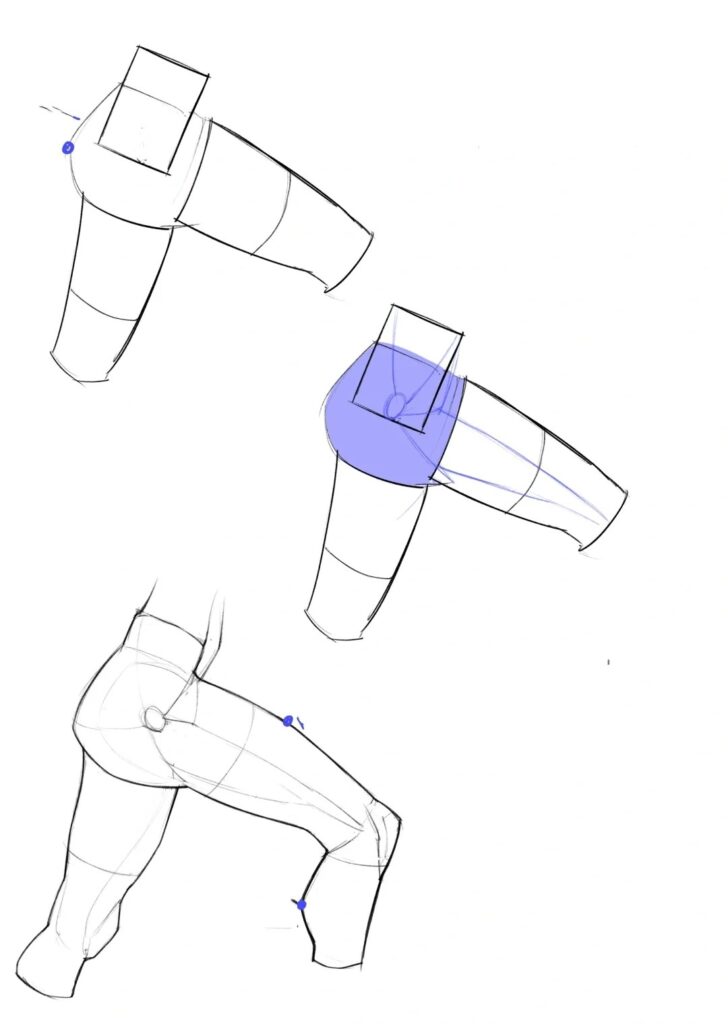
Thighs and Knees
Curvature and Shape of the Thighs:
- Basic Shape: Begin with the upper thighs. Imagine them as elongated cylinders that taper slightly as they approach the knees. The thighs should be about twice the length of the head.
- Muscle Definition: Indicate the quadriceps at the front and the hamstrings at the back with subtle lines. The inner thighs should curve gently, creating a natural inward slope towards the knees.
- Connection to the Hips: The top of the thighs should connect smoothly to the hips. Draw the pelvis as a broad, curved line to indicate where the legs join the torso.
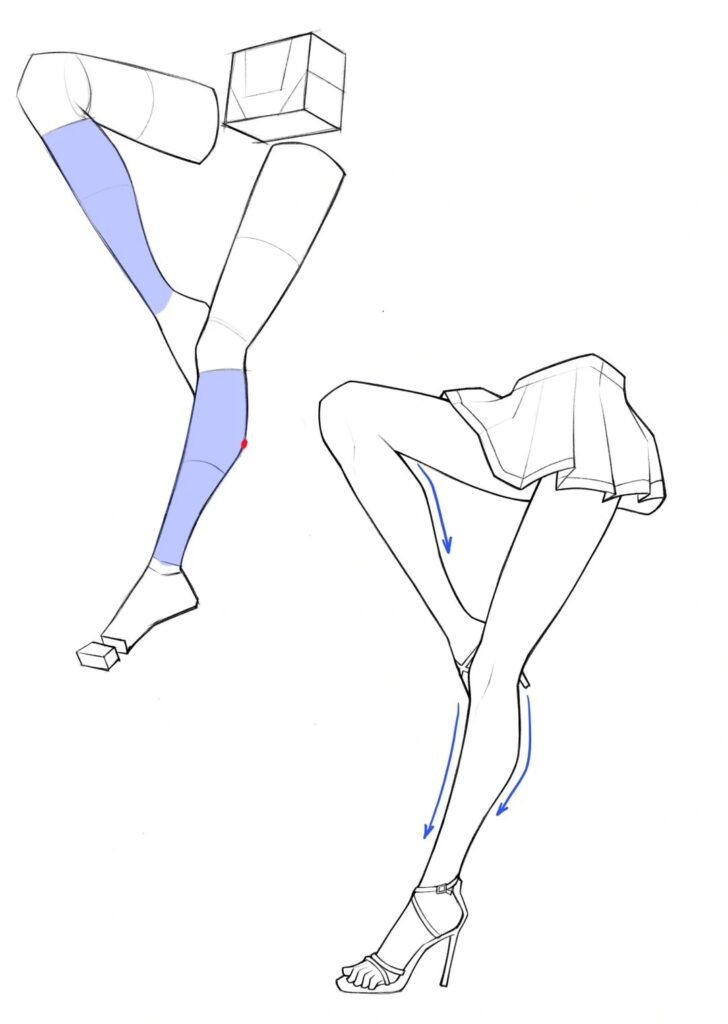
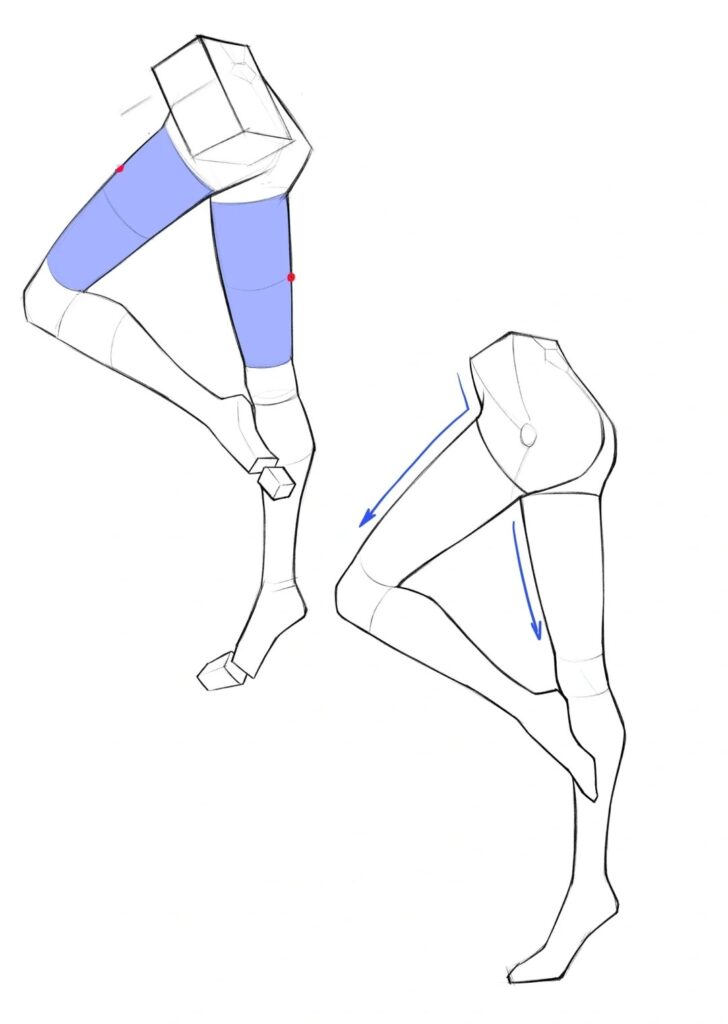
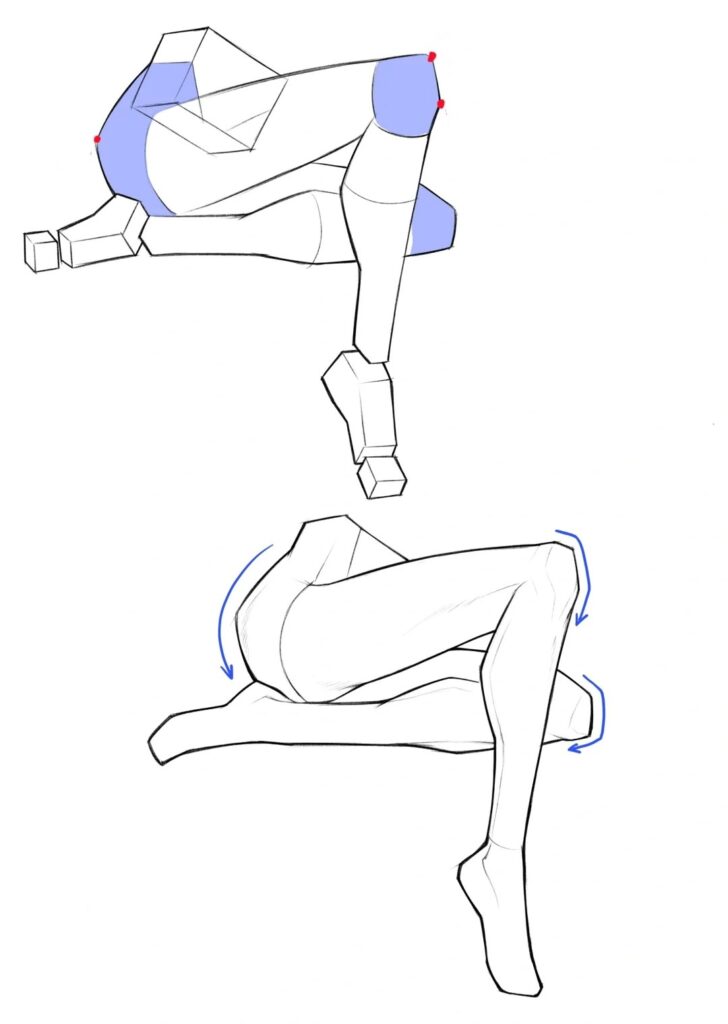
Knees:
- Positioning: The knees are placed at the midpoint of the legs. Draw small circles or ovals to represent the knee joints.
- Detailing: Show the knee cap (patella) as a small oval at the front of the knee joint. Add lines to indicate the tendons and ligaments that connect the upper and lower legs.
- Flexibility: Remember that knees are hinge joints, so they only bend in one direction. Draw slight curves to show the natural bending points.

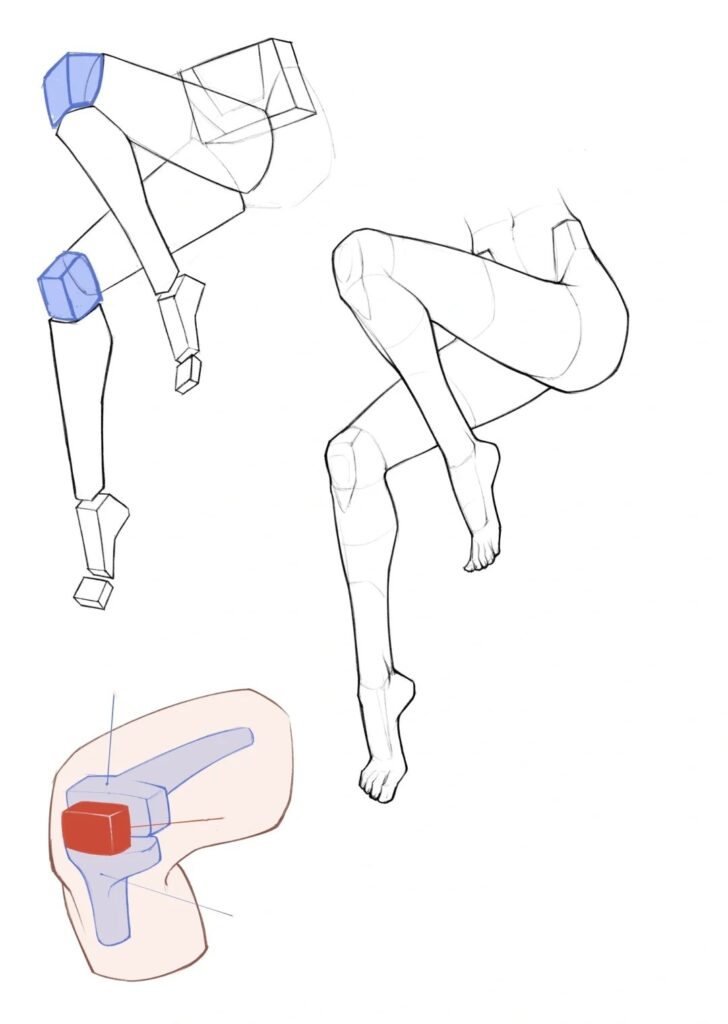
Lower Legs and Feet
Shape and Structure of the Lower Leg:
- Basic Shape: The lower leg extends from the knee to the ankle and should be slightly shorter than the thigh. Draw it as a tapered cylinder, wider at the top and narrower at the bottom.
- Muscle Definition: Indicate the calf muscles at the back and the shin bone (tibia) at the front. The calf muscles should bulge slightly at the midpoint of the lower leg, creating a gentle outward curve.
- Ankles: Draw the ankles as narrow connections between the lower legs and the feet. The ankle bones should be indicated with small, rounded shapes on either side of the lower leg.
Feet:
- Basic Shape: Start with the basic shape of the foot. Draw a triangle or trapezoid that extends from the ankle to the toes. The foot should be about the same length as the forearm.
- Arch and Heel: Indicate the arch of the foot with a curved line from the heel to the ball of the foot. The heel should be a rounded shape at the back of the foot, slightly elevated from the ground.
- Toes: Draw the toes extending from the front of the foot. The big toe should be the longest, with the other toes gradually decreasing in size. Each toe has two joints, except for the big toe which has one.
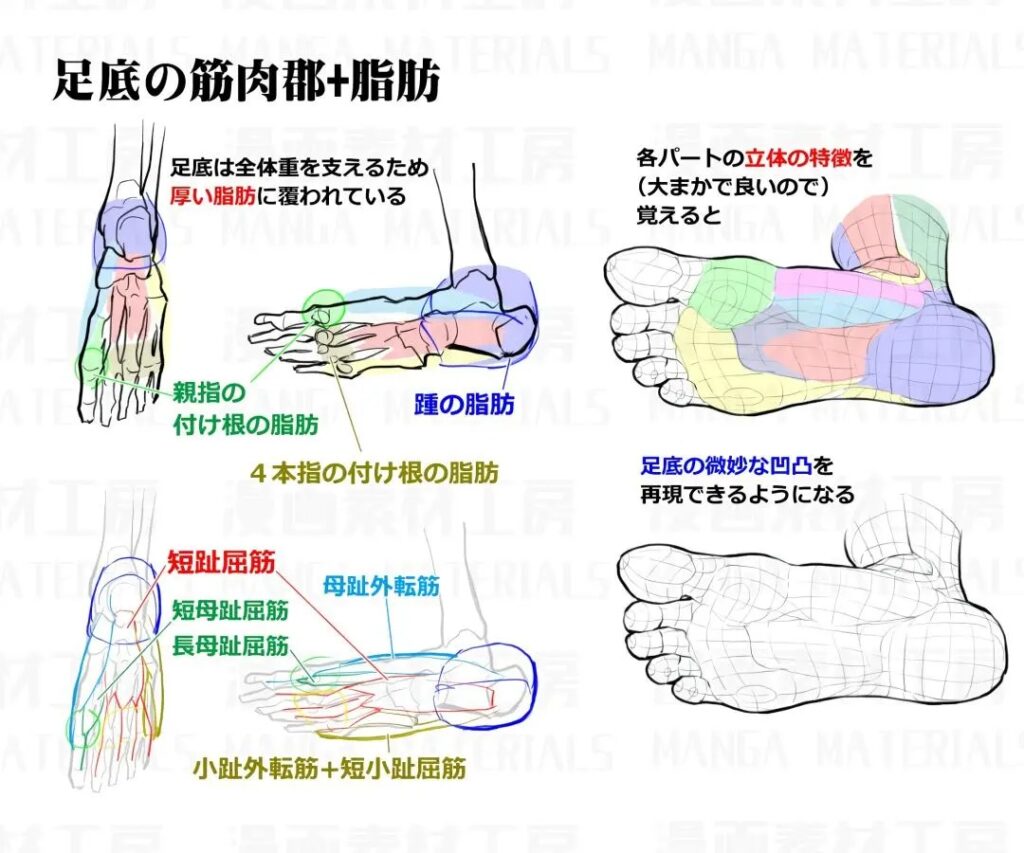

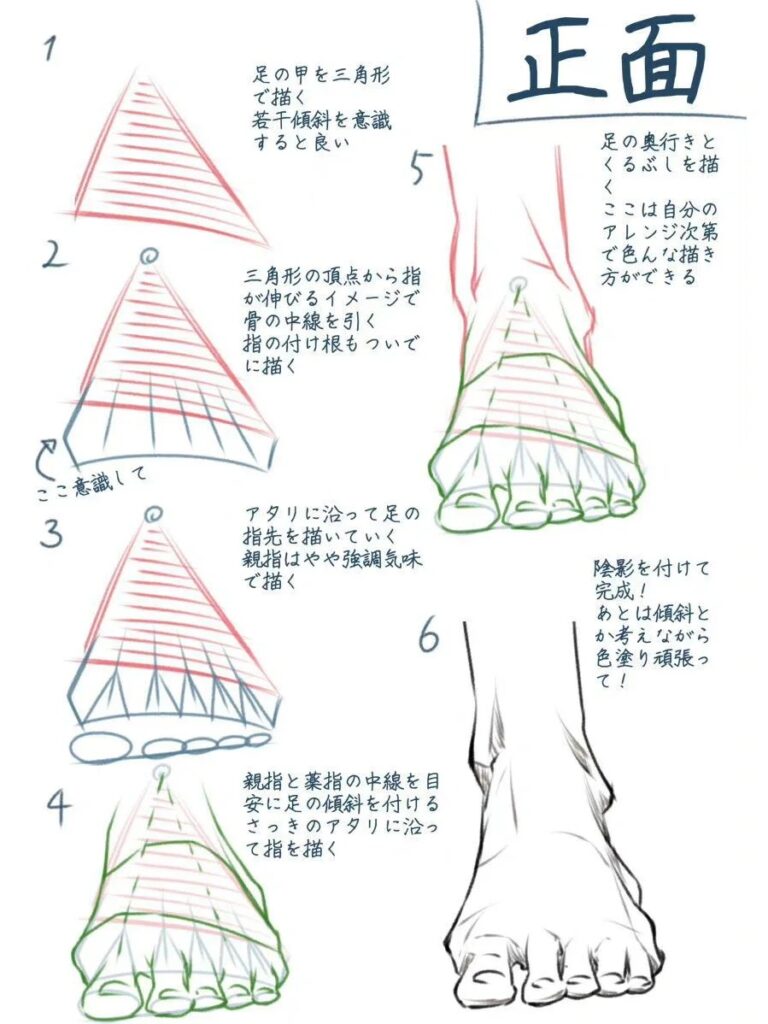
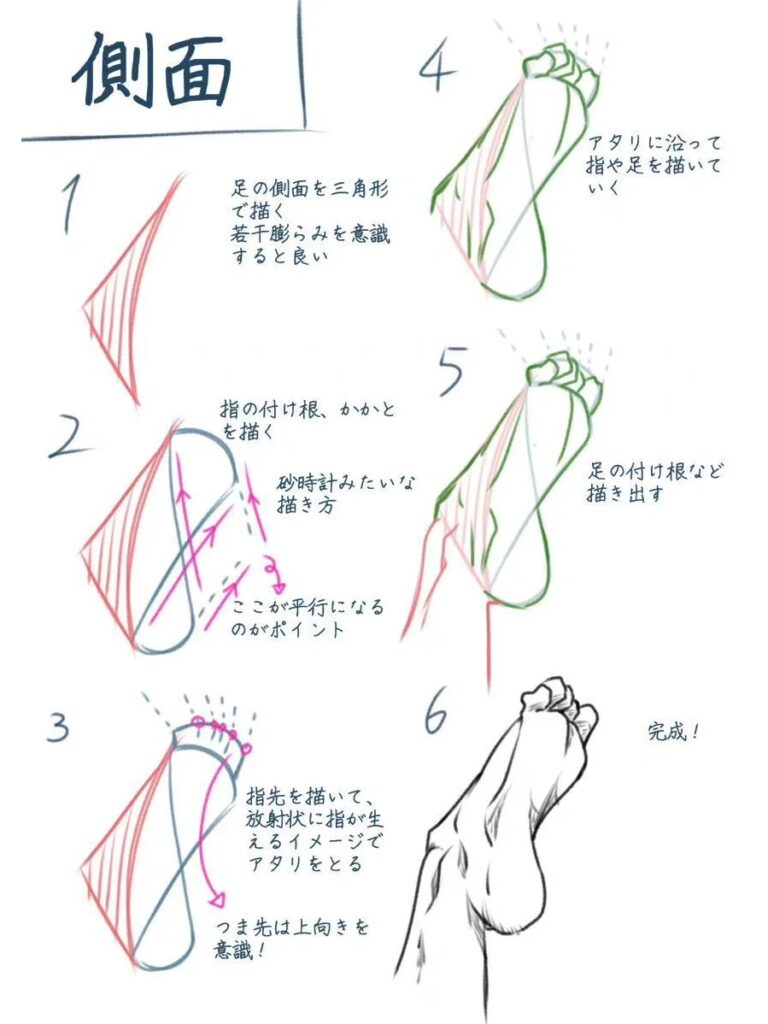
Details:
- Toenails and Flexibility: Add toenails as small, curved lines at the tips of each toe. Ensure the toes have a natural curve; they should not be perfectly straight.
- Natural Curvature: Show the natural curvature of the foot by adding slight bends to the toes and arch. This makes the foot look more realistic and dynamic.
By focusing on these details, your female body drawing will capture the natural look and movement of the legs. Each part, from the thighs to the feet, should look proportionate and lifelike. Let’s move on to the next section, where we will put everything together and refine the entire figure.
Bringing Your Female Body Drawing to Life: Adding Details
The magic of a realistic female body drawing lies in the details. From understanding the anatomy to mastering shading techniques, let’s explore how to add depth, dimension, and volume to your artwork.
Muscles and Bones
- Understanding Anatomy for Realism:
- Study of Anatomy: Familiarize yourself with the major muscles and bones of the human body. Knowing where the muscles attach and how they interact with bones is crucial for realistic drawing.
- Key Muscle Groups: Focus on key muscle groups such as the pectorals, deltoids, biceps, triceps, and the muscles of the legs like the quadriceps and calves. Understanding these will help you depict natural movement and tension.
- Bone Structure: Pay attention to the skeletal structure, especially the ribcage, spine, pelvis, and limbs. Highlighting the bones’ locations can add a layer of realism and improve the figure’s proportions.、
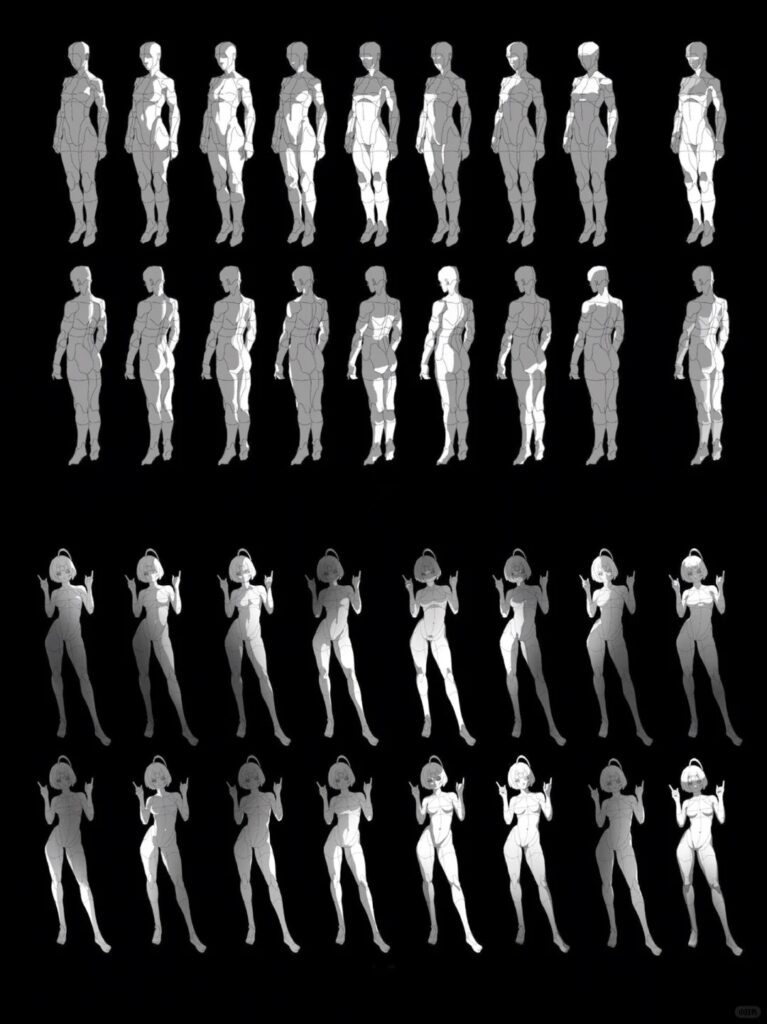
Shading and Shadows
- Techniques for Adding Depth and Dimension:
- Light Source: Decide on a light source for your drawing. This will determine where the shadows fall and how you shade the muscles and curves.
- Gradient Shading: Use gradient shading to create smooth transitions between light and dark areas. This technique helps to illustrate the roundness and volume of the body.
- Cast Shadows: Add cast shadows to show how one part of the body affects another. For example, the shadow of the arm on the torso or the leg on the ground adds a sense of realism.
Adding Volume
Emphasizing Curves and Subtle Changes in Shape:
- Curves and Contours: Use curved lines to emphasize the natural contours of the body. Soft, flowing lines can highlight the gentle curves of the hips, waist, and limbs.
- Cross-Hatching: Employ cross-hatching techniques to add texture and depth. This method involves drawing intersecting lines to create a sense of volume and form.
- Highlights: Add highlights to areas where light hits directly, such as the forehead, top of the shoulders, and along the thighs. This contrast against shaded areas brings out the three-dimensionality of the figure.
Final Touches:
- Refinement: Continuously refine your drawing by adding or adjusting small details. Look for areas where you can enhance muscle definition or improve the flow of lines.
- Consistency: Ensure consistency in the thickness of lines and the intensity of shading. This helps in maintaining a cohesive look throughout the drawing.
- Body Kun Model: Consider using a Body Kun model as a reference. These articulated figures can help you visualize and practice different poses and angles, making your drawings more dynamic and realistic.
By meticulously adding these details, your female body drawing will come to life with realistic anatomy, depth, and volume. The focus on muscles, bones, shading, and volume ensures that every part of the figure is well-defined and proportionate. This level of detail will not only make your drawing stand out but also provide a solid foundation for further artistic endeavors.
Final Touches: Polishing Your Female Body Drawing
Cleaning Up Sketch Lines
After you’ve established your drawing, it’s time to refine your work. Cleaning up sketch lines is crucial for a polished look:
- Erase Unnecessary Lines: Use an eraser to gently remove any extraneous sketch lines. This helps clarify the final form and keeps the focus on the details that matter.
- Refine Contours: Go over the important lines with a sharper pencil or pen to define edges clearly. This step enhances the overall structure of your drawing, making it more cohesive.
Using Layer Blending Modes
If you’re working digitally, layer blend modes can dramatically enhance your drawing:
- Experiment with Modes: Try different blend modes like “Multiply” for shadows and “Screen” for highlights. Each mode interacts with underlying layers in unique ways, adding depth and richness to your artwork.
- Layer Organization: Keep your layers organized by naming them according to their functions (e.g., “Shadows,” “Highlights”). This makes it easier to adjust elements as you finalize your piece.
Adding Highlights and Shadows
Highlights and shadows are essential for creating a sense of volume and depth:
- Identify Light Source: Determine where your light source is coming from. This decision guides where you place highlights and shadows, ensuring consistency in your drawing.
- Apply Gradients: Use soft gradients for shadows to create a more realistic transition from light to dark. Highlights can be sharper, particularly on shiny surfaces like skin or hair.
- Enhance Texture: Consider adding texture to surfaces like fabric or hair to give your drawing a more dynamic feel. This can be achieved through varied line work or digital brushes.
Considering Trademark and Copyright Issues
As you finalize your female body drawing, keep in mind the legal aspects of your work:
- Originality: Ensure that your designs are original. Avoid copying other artists’ works or using trademarked characters without permission, as this could lead to copyright issues.
- Credit and Fair Use: If you draw inspiration from existing art, consider crediting the original artist where appropriate. Understanding the principles of fair use can also guide you in using references legally and ethically.
By paying attention to these final touches, you elevate your female body drawing from a simple sketch to a stunning piece of art that captures attention and emotion. Now, take a step back, admire your work, and let your creativity shine!
Frequently Asked Questions: Draw Female Body
How do you draw a basic female body shape?
Start by breaking down the body into simple shapes like circles and rectangles. Begin with a rough outline to establish proportions, and gradually refine it into the desired shape, focusing on curves and anatomical landmarks.
How do you draw a female body outline?
To create a female body outline, sketch the overall silhouette using smooth, flowing lines. Emphasize key areas such as the shoulders, waist, and hips. Make adjustments as needed to achieve a balanced and natural look.
Why are female bodies easier to draw?
Many artists find female bodies easier to draw due to the emphasis on curves and softer lines, which can be more visually pleasing. However, drawing any body type requires practice and an understanding of anatomy.
Where do I start drawing my body?
Begin by observing your own body or using reference images. Focus on breaking the body down into simple shapes, and practice sketching basic poses before adding details.
What are some tips for drawing poses?
Use reference images or models to understand the dynamics of movement. Start with basic shapes to establish the pose’s structure, and don’t be afraid to make adjustments to achieve the desired balance and proportion.
What are good reference materials for drawing the female body?
Look for anatomy books, figure drawing resources, or online tutorials. Websites offering reference images, like art model sites, can provide valuable insights into different poses and body types.
Conclusion:
In summary, mastering the art of female body drawing requires a solid grasp of proportions, anatomy, and the ability to break down complex shapes into simpler forms. By focusing on key elements like the head, torso, arms, and legs, you can create more realistic and dynamic representations. As you delve into shading and adding details, you’ll discover how to bring your sketches to life, enhancing depth and dimension.
Remember, practice is essential to honing your skills. Don’t be afraid to explore various techniques and styles; each drawing is an opportunity to learn and grow. So, grab your sketchbook, find inspiration, and let your creativity flow! The more you draw, the more confident and skilled you’ll become. Happy sketching!